
Introduction
In this highly emerging world, the e-commerce industry has taken up a huge space. Competition is at its peak, along with the presence of new entrants. You need not like to affect the sales and conversions on your store.
Well, this is where you need to be very consistent and make smarter moves to bring out the best for your online. There is one highly preferred strategy that shines when it comes to grabbing more and more sales on your site. It is the quantity based pricing where you apply woocommerce dynamic pricing discounts for the customers. This is highly beneficial as it positively impacts the overall sales, revenue, and average order value too. In this blog, you will get acknowledged about how it works well for any woocommerce website.
What is Woocommerce Quantity Based Pricing?
Quantity based pricing in Woocommerce comes from offering huge discounts in exchange for users purchasing more from your store. In simple terms, when a user purchases more from your store, more discounts are applied at checkout. The prime motive is to encourage users to buy more from your store and boost sales.
When it comes to woocommerce, this term becomes more crucial, but it's not impossible to implement. It can be easily implemented in many ways, depending on the retailer’s strategy and customer preferences.
There can be so many ways you can put quantity based pricing in several cases:
Use Case A: Offering Price Breaks at Specific Quantities
Here we are taking an example of an online clothing store. Considering the quantity based discount on the selling of the t-shirts. If a customer purchases 5 T-shirts, a 10% discount will be applied to the overall purchase. And if they raise their order to 10 t-shirts, the discount offered will be 20% off on an overall purchase. This way, a 30% discount will be counted for the purchase of 15+ t-shirts. Thus, the increasing discount will prove beneficial for both the customers and the seller. It will positively impact the purchase value and the revenue.
Use Case B: Offering a per-quantity discount
Here is the next scenario in which the quantity based discount is applied to the customer's order every time they add a product after adding the initial product. After adding a single product, the discount offer will be applied every time a customer adds a product. What this means is that a customer is prompted to add more items to boost sales.
Why Use Woocommerce Quantity Based Pricing?
Quantity based pricing is always a win-win strategy if you are striving through the marketing phase. Setting boundaries on your woocommerce pricing structure leads to the betterment of your store revenue and sales. There are more benefits you need to know about quantity based pricing:
1. Increased Average Order Value
Quantity based pricing comes with higher chances of raised cart values as customers find products at very low prices. The urge to get more discounted value on their final purchase encourages them to buy more. This eventually impacts the increased average order value that helps boost the bottom line.
2. Enhance Sales of Underperforming Products
No store is left without having underrated products that are hard to sell. Well, online sellers always urge to raise their sales and this can be done using the quantity based pricing in Woocommerce. By doing this, you can focus only on those underrated products that are hard to sell.
3. Improve customer experience
When you apply woocommerce quantity based pricing on the products, it not only comes with boosted sales but enhanced customer experience too. Well, this even benefits when you want customer retention and make long-term trust among them.
4. Boost Revenue
There seems to be a big connection when it comes to correlating revenue and the quantity based pricing structure. When you put quantity based pricing on your store, it comes with more sales and ultimately leads to boosted revenue.
Apart from the above vital benefits of using quantity based pricing, you need to know the areas or applications that are impacted by it.
5. Wholesale Discounts
Quantity-based discounts are highly impacted when dealing with wholesalers. For those associated with both wholesale and retailers, this type of pricing can be offered with bulk purchases.
6. Product Bundles
Quantity-based pricing is even impacted when you allow product bundles on your store. Creating enticing product bundles encourages customers to purchase more from your store.
7. Buy One, Get One Offers (BOGO)
This is one of the most implemented and promotional types of quantity based discounts that help boost sales. This means a customer purchases a single thing and luckily gets a free one over the first purchase. Similarly, the urge to have free things will make customers make more purchases.
Setup Woocommerce Store using WordPress E-commerce Theme
Setting up the WooCommerce store is another vital step you need to do when going to apply woocommerce quantity based pricing. Most of you must have a Woocommerce store, and most of them might be looking to create one. So, here is the step-by-step guide to which you will get to know how to set up a woocommerce store.
1. Get Hosting and a Domain
To set up a Woocommerce store, you need to get hosting and a domain name for your store. You need to remember that for an online store or any website, domain and hosting are the two prime components to have. Without these, your store can’t run or function well. Also, you need woocommerce installation, as it helps in the effective running of your online store.
So, we will start with finding the right host and domain name for your online store. But let’s make this very clear about the hosting and the domain of a website. A domain is the addressing element of any website through which the users will be able to locate you on the web. It will appear like this on the web: “www.yourwebsitename.com”. On the other side, the hosting is like your home, where all the website belongings reside. Your host provides a server through which your website runs on the web.
While this means a lot, choose the right domain and hosting for the effective functioning of your website. Also, it impacts the website speed, security, and reliability of your website. With hundreds of active hosting providers, sticking to the right one is quite crucial. But out of all the top names, we have found the right one for you.
When searching for the best domain providers, you need to be very picky, as this is the addressing element of your website. But let me disclose something: some hosting providers come with their domain providers that you need to know. Fortunately, Bluehost has a free domain service. So without any delay, let’s move on to getting the Bluehost service for you.
- Firstly, you need to reach Bluehost's official website and tap the Get Started Now button. From there, you will be taken to a page with various plans enclosed for you to buy.
- Here, you can choose from three to four plans for your website. From this, you can select the plan that seems convenient to you.
- As an advisory note, if you are starting as a beginner, you must go with the basic plan. It costs $2.75 per month and includes a free SSL certificate and more features.
- For now, we are going with the basic plan, as this one seems convenient to beginners. After this, you can get the premium version too. You need to now choose the basic plan and move ahead to the next page.
- The next page will ask you to create a unique domain for your Woocommerce store. Here, you can either choose the existing domain or create a new one.
- Once you are done with setting up the domain, the next page is the billing page, where you need to complete the payment.
- Enter all the necessary billing information and complete the purchase. Right after this, you will be able to access the hosting dashboard along with installing WordPress.
2. Install WordPress
Installing WordPress is a kind of easiest step when you have chosen the right host for your website. It is seen that most reputed web hosts provide a single-click WordPress installation, which makes it easier for users to move ahead with other steps.
Bluehost is one of the most considerable hosts that it provides for installing WordPress with a single click. To start with, you already have access to the Bluehost Hosting dashboard. From there, you need to log in to the Bluehost Hosting account and then select Hosting from the left sidebar.
- Once the hosting page is visible, tap the Add Site button at the bottom. On the next page, you will need to tap the “Install WordPress” button and then tap the Continue tab.
- You can then give a title to your website and the domain to which you need to connect to your website, and finally tap the Continue button.
- This will immediately install WordPress for you. Once WordPress is installed, you will see a tab “Log in to WordPress,” from which you will reach the WordPress dashboard.
3. Choose a WordPress Theme
As you have successfully logged in to the WordPress dashboard. It's time to give a customizable appearance to your website. For this, you need a WordPress theme that makes your website look attractive and a door to many customers and also supports your agenda of woocommerce quantity based pricing.
A theme is an enticing element that helps in boosting the overall appearance and functionality of the website. It comes with a set of templates, layouts, and plugins to help your site gain massive functionality.
Currently, WordPress is serving over 55,000 themes available for every sort of venture or blog you need to build. When you have installed WordPress on your website, it comes with a default theme that can be customized easily.
But if you need to take another look through your theme, then you can go through the entire WordPress theme library to set your website game. You can find the right theme from thousands of paid and free WordPress themes.
But to make a confident choice, you must know the fine criteria to choose a theme that shines throughout. Here are some of the most considerable facts you need to know about choosing the right WordPress theme:
- Make sure the theme uses a simple and minimal design.
- It should be compliant with the latest WordPress versions.
- It should be easy to customize and make its own.
- The theme should follow a responsive design.
- The theme must have the necessary plugins attached to it.
- For e-commerce stores, it must have Woocommerce-enabled features that help in setting up your store faster.
These are the common facts you must apply while choosing the right theme for your website. Since we are dealing with the e-commerce industry, it is vital to choose the right e-commerce theme.
Among thousands of the latest Woocommerce themes, choosing the right Woocommerce theme is way more than a crucial task. But, here is something good for you. Themes presented by VW Themes are getting hyped in the market. Trust me, VW designs the most voracious and high-quality premium WordPress themes that you can’t ignore.
WordPress Ecommerce Theme:

One of them is the WordPress E-commerce theme that shines throughout the Woocommerce theme collection. The theme is designed to fulfil all the vital criteria for a perfect online store. It comes with its latest WordPress versions so that you get the most trendy features and designs. The theme has a responsive design and can be customized to advanced levels. Also, you get a complete layer of templates and layouts that bring out the best in your online store.
So, let’s head to install this WordPress e-commerce theme on your WordPress website.
- To install this theme, you need to reach the WordPress dashboard and tap the Appearance tab.
- Under this, tap the Themes option, and you will reach the theme page, where you can see there is already a theme installed on your website.
- To add a new one, tap the “Add New” button and you will be taken to the WordPress Theme library. Here, you can search for the “WordPress E-commerce theme”.
- Once found, tap the Install button right under the theme image. Once it is installed, tap the Activate button to get it on your website.
4. Install Woocommerce
Once you have the theme installed on your website, you need to now focus on the main element of your online store.
To make it Woocommerce-compatible, you need a Woocommerce plugin. Since Woocommerce is a plugin, you need to install it manually on your website. Also, to achieve your goal of woocommerce quantity based pricing you need woocommerce.
Without much time, we will start configuring the Woocommerce store settings. Once you have activated the Woocommerce plugin, it will launch its setup wizard, where first you need to enter the physical address of your store.
The next steps will ask you to add the industry, product type, and other business details. Also, it will ask you to add other business features or not. Here, you can check the box to install the free features for your online store and tap the Continue button.
Since we have already installed a Woocommerce-enabled theme, we will skip to the next step to set up your online store.
5. Setup a Woocommerce Store
- After the activation of Woocommerce, you can see it will appear on the dashboard area with a drop-down list of features.
- You need to start from the Home tab, where you can set up the complete store. The first step arrives when you need to add the products to your store.
- Woocommerce, again, makes it super easy to add products through CSV import, add a product template, or simply import from another device.
- Adding a product template is just as simple, as you need to tap “Start with a template." Then you need to select the product type among three options. Choose “Physical Products” and tap the “Go” button, and you will see a window where you need to add complete details about the product.
- Once you have added the complete product details, tap the Publish button, and you can apply this process for every product.
- Now, to set up payments for your store, head back to the Home section, where you will find the Setup Payments options.
This will display a list of available payment options, where you just need to tap the Setup button in front of the suitable payment option. In case you want to go with a custom payment option, you can set it from the Settings tab under the Woocommerce tab.
- To set up taxes in Woocommerce, you need to head to the Settings tab under the Woocommerce tab. Then tap the Taxes option.
- Simply, you need to enter the vital details and save the updated details to apply taxes to your store.
- Next, you need to set up shipping on your Woocommerce store. For this, it is required to go back to the store setup wizard and tap Set Shipping Costs.
On the shipping page, you can either set up shipping costs according to your country or leave it free shipping. If you wish to ship your products worldwide, you need to enter shipping costs under the “Rest of the World” option. Once done, you need to tap the Proceed button, and it will save all the changes.
Finally, you have your store ready, where you can start selling your products. But we are more focused on how to create Woocommerce quantity based pricing on your store.
How to Apply Quantity Based Pricing in WooCommerce?
Apart from its most compelling features, Woocommerce does not support adding quantity based WordPress woocommerce pricing on its own. For this, you need to use quantity based pricing plugins. Here are some of the best quantity pricing plugins you can use to set quantity based pricing on your store:
1. Woocommerce Dynamic Pricing and Discount Rules by DotStore
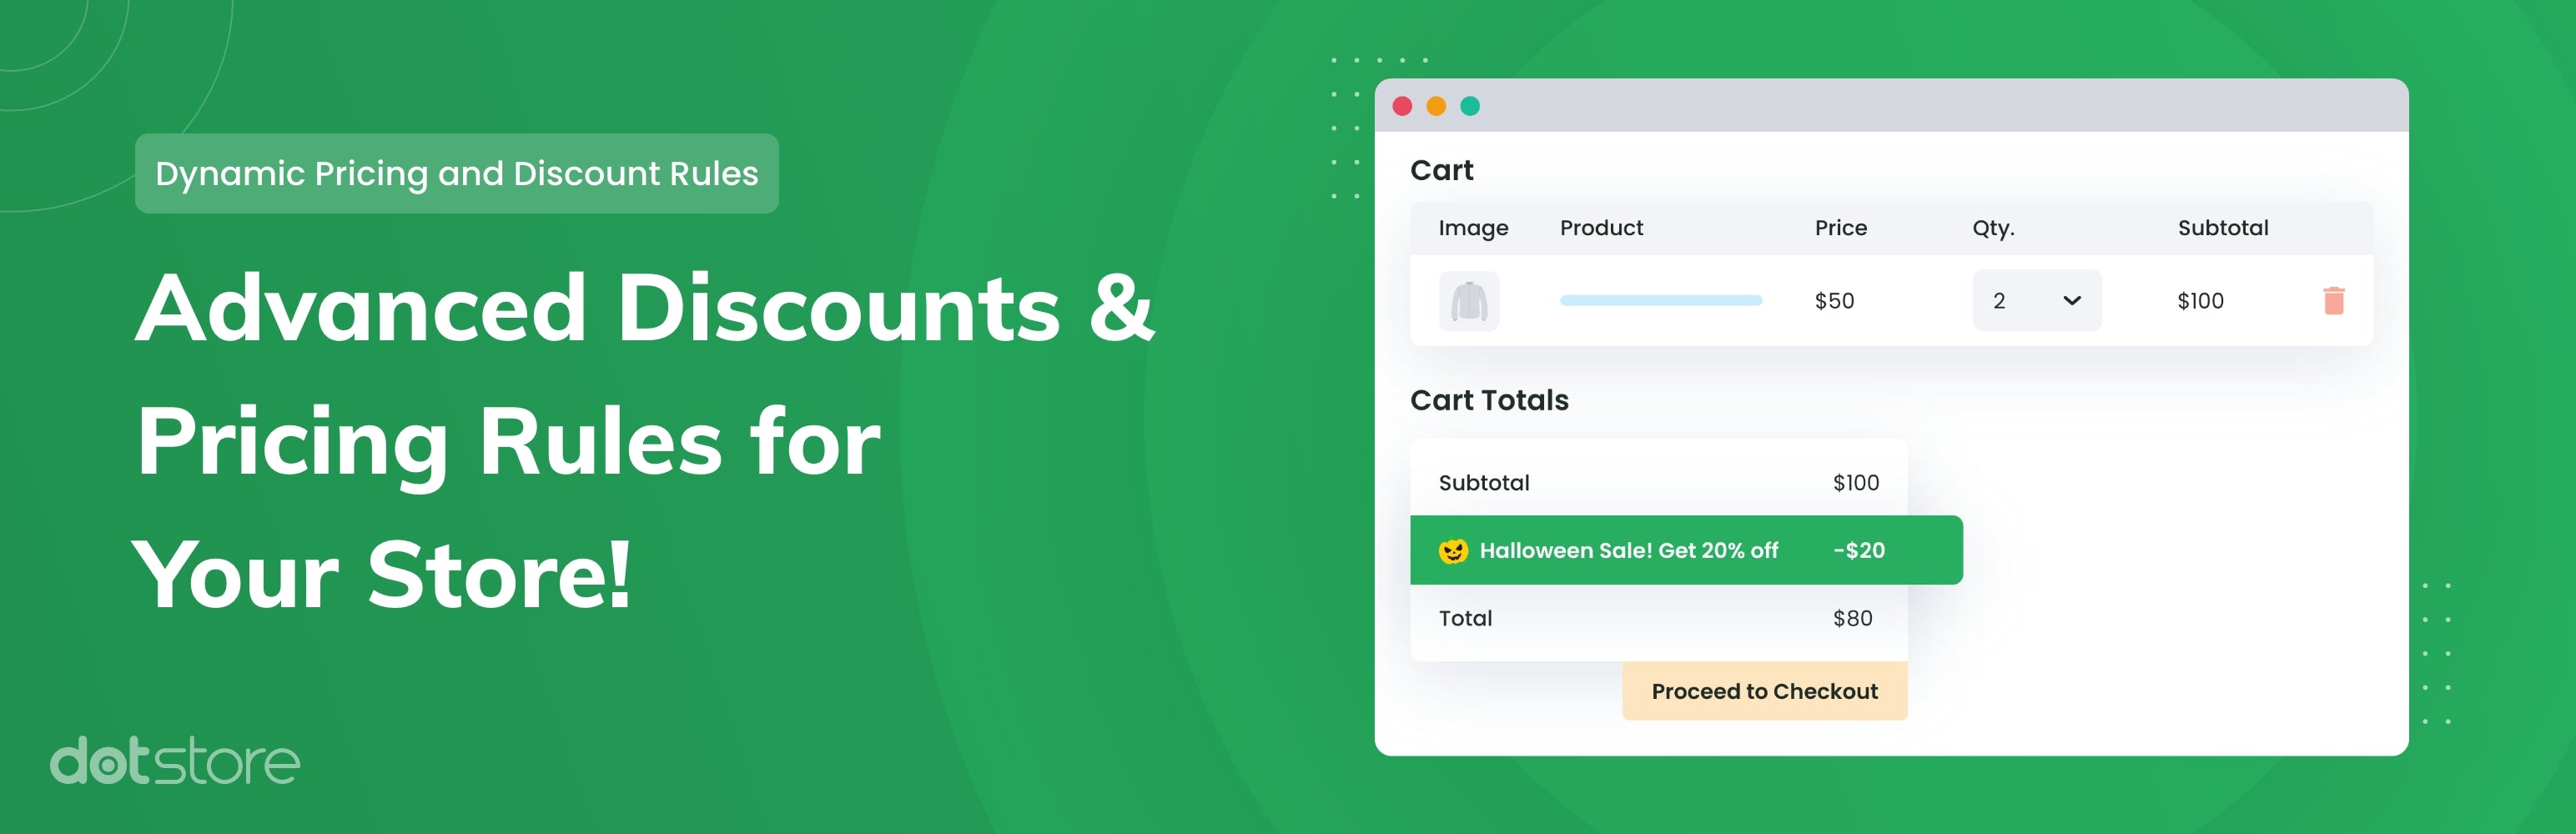
The Woocommerce Dynamic Pricing and Discount Rules by DotStore plugin is a top-quality plugin to offer discounts on your online store. The plugin comes with multiple discount types like BOGO, per cent-based, flat rate, and more. It allows you to set up discounts based on various user roles or categories too. The interface is super easy and can be used to figure out how to set various tiered pricing tables. It even provides flexible options to create discounts based on various conditions.
2. Woocommerce Fees and Discounts by Plugin Republic

This Woocommerce Fees and Discounts by Plugin Republic is another incredible tool to apply woocommerce quantity based pricing. Just like others, it even offers category-based discounts, bulk pricing, user roles, and multiple shipping methods. Dynamic pricing features are directly applied to the cart features. Also, its flexible interface allows setting fees and discounts way easier.
3. Discount Rules for Woocommerce by Flycart

The Discount Rules for Woocommerce come with a variety of discount types, including BOGO offers, category types, user roles, and more. The plugin has a dynamic pricing structure for different product quantities. Apart from giving good features and a flexible interface, it comes with an option to promote your discount offers too.
A Guide to Setup Woocommerce Quantity-Based Pricing
To set up quantity based pricing, we are using the discount rules and dynamic pricing for woocommerce.
- To start with, you need to first get this plugin installed and activated on your store.
- Rush to the WordPress dashboard area and tap the Plugins option.
- Tap the Add New button and search for the Woocommerce Dynamic Pricing and Discount Rules plugin. Once found, tap the Install button and then the Activate button.
- After the plugin is activated, you can see it will appear in the dashboard area. You need to tap on the plugin.
- To create a new conditional discount rule, tap the Add New button.
Here, you need to give a name to the discount rule and choose whether you need to add a flat-rate or per cent-based discount. Here, you can apply woocommerce quantity based pricing discounts in multiple ways.
- To apply global per-quantity discounts, tap the “Apply Per Quantity” box and then select the Cart from the dropdown menu.
- You need to now select the discount value per quantity and finally tap the Submit button. This will apply a discount to every additional product in the cart.
- To apply a product/category/tag-specific per-quantity discount, you need to again tap the “Add New” button. Select the discount type, and under the value list, you need to select the product option.
- Scroll down a little to the Discount Rules for checkout and tap the button “Add Row." Now, from the left corner under the drop-down list, you need to choose a type. Here, we are choosing the category type.
- You need to then set the Middle dropdown menu to “Equal to” or not equal to. Then choose the product/category/tag that the rule should be applied to.
- Tap the Submit button, and you will see the discount will be applied to every product based on the selected category type.
In this way, you can apply more discount types on your Woocommerce store, such as specific quantity discounts and advanced product and category discounts.
Conclusion
That was all about acknowledging you about Woocommerce quantity based pricing in multiple ways. This is quite beneficial if you are dealing with lower sales and traffic issues on your WooCommerce store.
Applying quantity based pricing leads to better upliftment of your online store as you put challenges for users to buy from your store. This is a smart strategy that helps both sellers and customers in every possible way it can. It helps increase the average order value, boost conversions, enhance the customer experience, boost revenue, and more. The benefits are uncountable, so you just need to apply this strategy to your store. And we have made a complete guide on how you can effectively create quantity based pricing in your store. From its benefits to a step-by-step guide, there is everything hidden in the above blog. Also, you can see that we have made a comprehensive guide on how to set up a woocommerce store.
Additionally, to further enhance your store’s functionality and appearance, consider using the WP Theme Bundle, which offers a wide range of premium themes designed for WooCommerce stores. With this bundle, setting up a visually appealing and user-friendly store becomes even easier. Plus, we’ve made a comprehensive guide on how to set up a WooCommerce store, ensuring you have everything you need to succeed!
Blogs Categories
- AI Tools
- All
- Best Website Themes For WordPress
- Best WordPress Templates
- Best WordPress Themes 2020
- Blog
- Buy WordPress Themes
- Fansite WordPress Themes
- free wordpress templates
- Google Updates
- Hosting
- Hybrid WordPress Themes
- Marketing
- Mobile App
- Premium WP Theme
- Responsive WordPress Themes
- SEO
- Smoothie WordPress Theme
- Social Media
- Themes for WordPress
- Tutorials
- VW Updates
- Web Design
- Web Development
- Website Builder
- Website Security
- Website Templates For WordPress
- WordPress Errors
- WordPress Plugin
- wordpress plugins
- WordPress Premium Theme
- WordPress Sale
- WordPress Themes
- WordPress Website Themes
Podcast WordPress Theme (Audio Podcast 2.0)

Latest WordPress Themes


Buy All our Premium Themes just at $99
