Creating downloadable product in WooCommerce store is an excellent way to diversify your offerings and cater to the growing demand for digital goods. Whether you're selling eBooks, software, music, courses, or design assets, WooCommerce provides a robust and user-friendly platform to facilitate seamless digital transactions. Downloadable products are cost-effective and require minimal overhead since they eliminate the need for inventory, packaging, and shipping. Moreover, they can be sold globally, opening your business to a wider audience.
In this blog, we’ll explore the entire process of creating and managing downloadable product in WooCommerce store. You’ll learn how to configure your store settings for digital products, upload your downloadable files, set appropriate pricing, and ensure a secure delivery to your customers. Whether you're a beginner or looking to expand your existing WooCommerce store, this tutorial will make the process simple and efficient. Let’s dive in!
What is Downloadable product in WooCommerce?
A downloadable product in WooCommerce refers to a type of digital product that customers can purchase and download directly from your store. These products can range from eBooks, music, videos, software, and plugins to digital art, educational content, and more. Unlike physical goods, Woocommerce downloadable products are intangible, eliminating the need for shipping or inventory management. When a customer purchases a downloadable product, they receive a unique link to access the file, which can be configured to limit the number of downloads or access period for enhanced security.
This type of product is highly scalable, cost-effective, and ideal for businesses aiming to reach a global audience with minimal logistical challenges. WooCommerce simplifies the process of selling digital goods, offering features like secure file delivery, flexible pricing options, and customizable product settings.
Steps to Create Downloadable product in WooCommerce
Creating a downloadable product in WooCommerce involves several steps, from setting up your store for digital sales to ensuring secure delivery of files to customers. Below, we’ll delve into the process in detailed, easy-to-follow steps.
Step 1: Install and Activate WooCommerce

To start creating a downloadable product in WooCommerce, the first step is to install and activate the WooCommerce plugin on your WordPress website. WooCommerce is a powerful, free plugin that transforms a standard WordPress site into a fully functional online store, making it ideal for selling both physical and digital products.
If WooCommerce isn’t already installed, the process is straightforward:
- Log in to your WordPress. Use your login details to access the backend of your website.
- In the left-hand menu, click on "Plugins" and then select "Add New". In this section, you can search for and install new plugins.
- Search for WooCommerce. In the search box at the top right corner, type "WooCommerce" and press Enter. The plugin, developed by Automattic, should appear as the top result.
- Click Install Now. Once the installation process completes, the button will change to Activate. Click on it activate the plugin.
After activation, a setup wizard will guide you through configuring your store’s basic settings. You'll define the store's currency, preferred payment methods, tax settings, and other essential options. This foundational step is crucial for enabling your store to handle the sale of downloadable product in WooCommerce efficiently.
Step 2: Configure WooCommerce Settings for Downloadable Products

Before you begin adding digital goods, it’s essential to configure your WooCommerce settings to support downloadable products effectively. Proper configuration ensures seamless delivery, security, and a positive user experience. Here’s how to set up your store for selling downloadable product in WooCommerce:
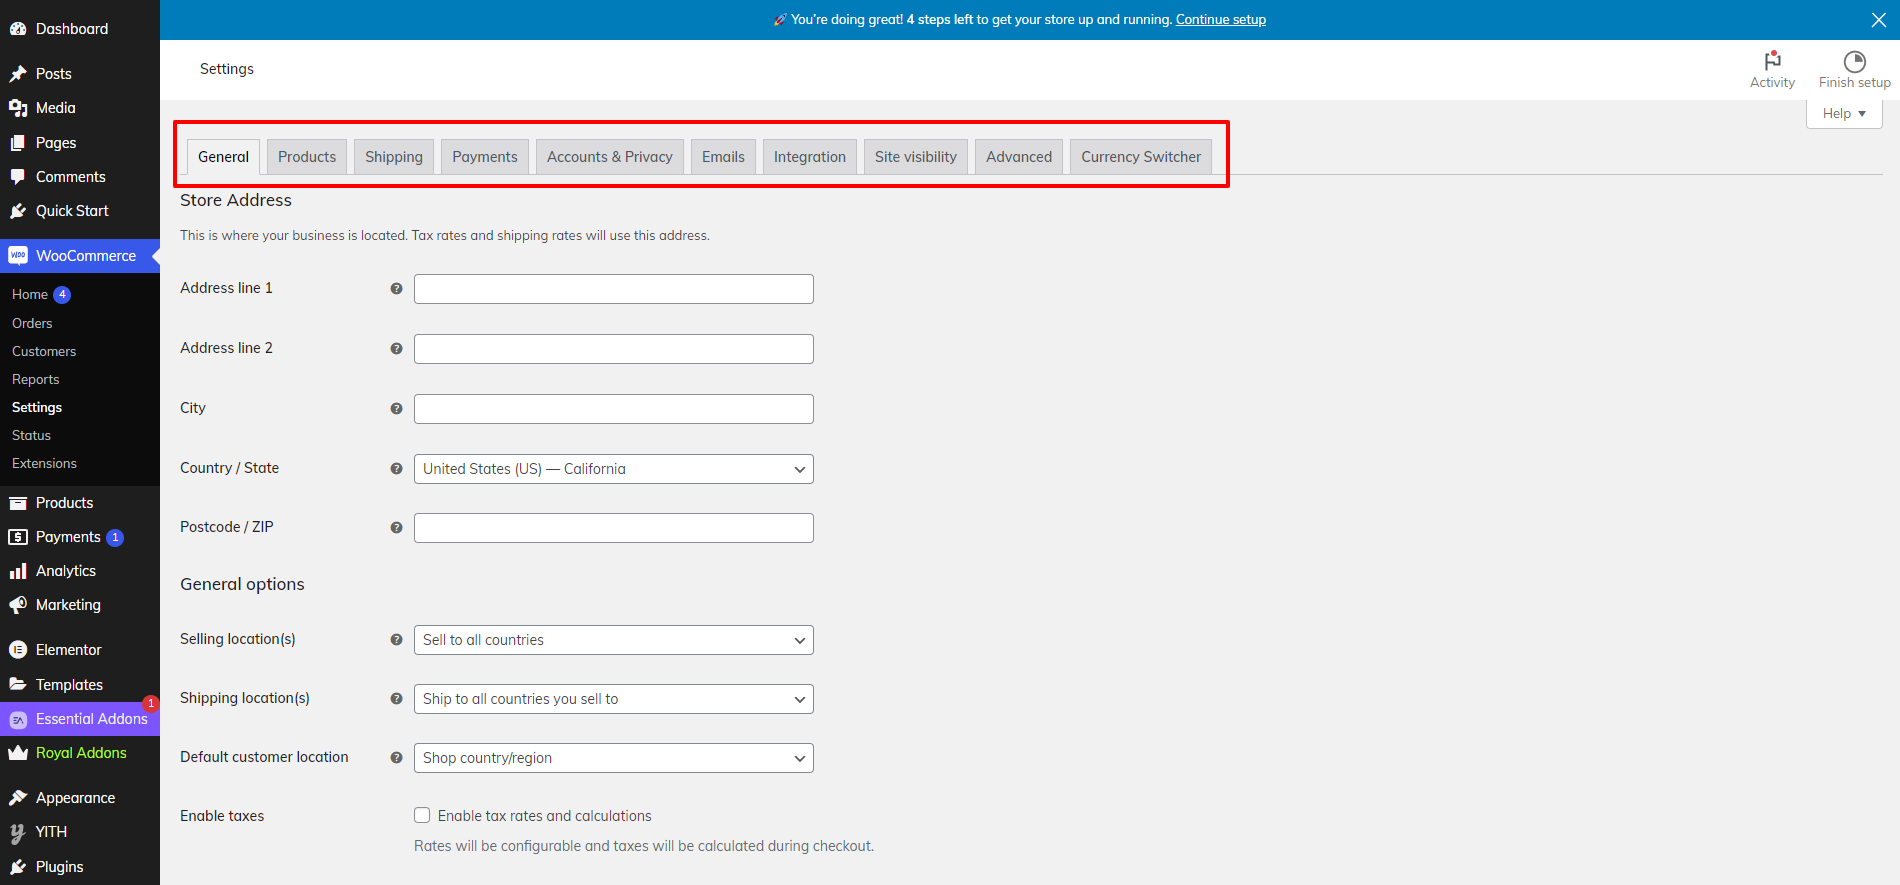
Start by navigating to WooCommerce > Settings > Products > Downloadable Products in your WordPress dashboard. This section contains all the necessary options to manage and deliver digital files. The first crucial step is selecting the File Download Method. WooCommerce offers three options:
- Force Downloads: This method securely serves files through PHP, ensuring that download links are protected from direct access. It’s the recommended choice for most stores as it balances security and ease of use.
- Redirect Only: This option redirects customers to the file’s URL for download. While straightforward, it lacks robust security measures, making it suitable only for non-sensitive digital files.
- X-Accel-Redirect/X-Sendfile: This is the most secure method, utilizing server capabilities to protect file access. However, it requires advanced server configuration, so consult your hosting provider if needed.
Next, enable Access Restriction to ensure only paying customers can download files. This prevents unauthorized sharing or access to your downloadable product in WooCommerce.
Finally, click Save Changes to apply your settings. These configurations lay the foundation for securely and efficiently selling digital products in your WooCommerce store, safeguarding your files while ensuring a seamless customer experience.
Step 3: Add a New Downloadable Product

Once you’ve configured the necessary settings for downloadable product in WooCommerce, the next step is to add your first product. This process is straightforward and allows you to customize the product page to reflect its value and appeal to your target audience. Follow these steps to get started:
Begin by navigating to Products > Add New in your WordPress dashboard. This opens the product editor, where you can input all the essential details about your downloadable product in WooCommerce. Start with a compelling product title that clearly communicates what the digital item is about. For example, use titles like “Photography Masterclass eBook” or “Ultimate Social Media Marketing Templates” to grab attention and convey the product’s purpose.
Next, focus on the product description, which is one of the most critical elements for converting visitors into buyers. In the text editor, provide a detailed explanation of what the product offers, its benefits, and how it solves a problem or fulfills a need. Use bullet points, headings, and formatting options like bold or italics to make the description scannable and visually appealing. Incorporate multimedia such as images, infographics, or even videos to enhance the presentation. These visual elements create a richer user experience, making your downloadable product in WooCommerce more enticing to potential customers.
Step 4: Configure Product Data

Once you've entered the product title and description, the next critical step in creating a downloadable product in WooCommerce is to configure the Product Data section, here you will find list of different Woocommerce product types. This area, located directly below the description box, is where you’ll define key details for your digital product, including pricing and file upload settings.
- Choose Simple Product: From the Product Data dropdown, select Simple Product. This option is ideal for digital goods that do not require variations, such as eBooks or software. Selecting this ensures that your product remains straightforward, without the need for complex configurations such as size or color options.
- Check the Virtual and Downloadable Boxes:
- Virtual: Checking this box tells WooCommerce that your product does not require shipping. Digital goods are inherently "virtual" since they are delivered electronically, so selecting this option removes shipping-related fields from the product setup, streamlining the process.
- Downloadable: Enabling this box activates the Downloadable Files section below, allowing you to upload the digital file that customers will download after purchase.
- Set Pricing: Enter the Regular Price of your downloadable product, which is the standard price customers will pay. If you are running a promotion, you can also set a Sale Price, which will be visible on the product page, with the original price struck through.
- Upload the Digital File:
- Under the Downloadable Files section, click Add File to upload your product.
- Name the file (e.g., "Ebook Chapter 1"), and click Choose File to select the file from your computer. WooCommerce supports multiple file uploads, so you can include supplementary content like bonus chapters, templates, or videos.
- Set Download Limits and Expiry (Optional):
- Download Limit: You can restrict the number of times a customer can download the file. For instance, setting a limit of three downloads ensures the product isn't shared excessively.
- Download Expiry: You can also specify an expiry date for the download link, allowing access for a limited time. For example, you might set the link to expire 30 days after purchase to encourage prompt access and discourage file sharing.
These configurations ensure that your digital product is set up for seamless delivery while providing a secure and efficient process for your customers.
Step 5: Optimize the Product Page

To ensure higher conversions for your downloadable product in WooCommerce, it’s essential to optimize the product page to make it engaging and user-friendly. The product page is often the first interaction potential customers have with your product, so it’s crucial to create a compelling and informative page that encourages visitors to purchase.
- Compelling Short Description: Below the product title, add a short, catchy description that summarizes the key benefits and features of your downloadable product. This snippet should quickly communicate what the product offers and why customers should be interested. It will appear on category pages and search results, so make it attention-grabbing and relevant.
- High-Quality Product Image or Thumbnail: Upload a high-quality product image or thumbnail that clearly represents your digital product. Since there’s no physical product, the image should visually communicate what the customer is getting whether it’s an eBook cover, a software screenshot, or a digital template. A well-designed image creates trust and professionalism.
- Product Gallery with Additional Media: Enhance the customer experience by including additional images or a video demonstration in the Product Gallery. A video can showcase the product in action, explaining its benefits and features, which can help persuade customers to make a purchase.
- Assign Categories and Tags: Organize your products by assigning them to relevant categories like "Ebooks" or "Digital Templates." Categories help customers navigate your store. Add relevant tags to improve discoverability and ensure your product appears in related searches.
- SEO Optimization: Use an SEO plugin, like Yoast SEO, to optimize the product’s meta title, description, and keywords. This ensures that your product page ranks higher in search engine results, making it easier for potential customers to find.
- Preview the Product Page: Before publishing, preview the product page in WordPress to ensure that all elements look perfect. Check for any spelling errors, broken links, or formatting issues. A polished product page builds credibility and increases the likelihood of conversions.
By optimizing these aspects, your downloadable product in WooCommerce will be positioned for better visibility, higher engagement, and ultimately, increased sales.
Step 6: Publish Your Downloadable Product and Test

Once all the details for your Downloadable product in WooCommerce are complete, it's time to make your product live on your store. To do this, simply click the Publish button located in the top right corner of the product editing page. This action will make your downloadable product visible to customers on your WooCommerce store. At this point, customers can view the product, add it to their cart, and proceed with the purchase.
However, before you begin promoting your product, it's crucial to conduct a test purchase to ensure everything works smoothly. This step helps confirm that the entire buying and downloading process functions as intended, providing a seamless experience for your customers.
To test the product:

- Visit your store as a customer: Navigate to your store and locate the downloadable product.
- Add the product to your cart: Click on the product and proceed to add it to your cart.
- Proceed to checkout: Go through the checkout process and complete the payment using a test payment gateway (like PayPal Sandbox or a similar service).
- Confirm the download process: Once the transaction is completed, verify that the download link appears in the order confirmation email and is accessible from the My Account page. This ensures that customers can easily access their purchased digital product.
By thoroughly testing the process, you can ensure that the customer experience is flawless, boosting customer satisfaction and trust in your WooCommerce store.
Step 7: Promote Your Downloadable Product
Once you’ve created your downloadable product in WooCommerce, promoting it effectively is key to driving traffic and increasing sales. Here are several strategies to help you effectively market your digital goods:
- Share on Social Media, Email Newsletters, and Blog Posts: Utilize platforms like Instagram, Facebook, Twitter, and Pinterest to showcase your downloadable product. Post visually appealing images, videos, or customer reviews to spark interest. Engage with followers by offering special promotions or discounts. Additionally, promote your product through email newsletters, keeping your subscribers informed about new releases or special offers. Writing blog posts related to your downloadable product can also drive organic traffic and boost visibility.
- Paid Ads and Influencer Marketing: Paid advertising, such as Facebook Ads or Google Ads, can help you reach a wider audience. Targeting specific interests and demographics ensures that your ads are seen by potential buyers. Influencer marketing is another powerful tool for promoting downloadable product in WooCommerce. Partner with influencers or bloggers in your niche to showcase your products to their followers. Influencers can provide honest reviews and recommendations, driving trust and conversions.
- Leverage Affiliate Marketing: Affiliate marketing allows you to collaborate with bloggers or influencers who can promote your product in exchange for a commission on sales. This expands your reach and brings new customers who trust the recommendations of affiliates.
- Additional Tips for Selling Downloadable Products:
- Bundle Products: Offer bundles that combine related downloadable products to increase the value for customers and boost your sales.
- Subscription Plans: Create recurring revenue by selling subscriptions for access to premium content, updates, or exclusive digital products.
By following these steps, you can easily set up and sell downloadable products in your WooCommerce store. Whether you're a content creator, developer, or entrepreneur, the flexibility of WooCommerce makes it a powerful platform for monetizing digital goods.
Conclusion
In conclusion, creating downloadable products in your WooCommerce store offers a seamless way to sell digital goods without the hassle of inventory or shipping. By following the steps outlined above, you can easily set up and manage downloadable products, providing customers with instant access to eBooks, software, stock images, and more. Whether you’re selling digital content or services, WooCommerce makes it simple and secure to deliver your products.
If you’re looking to create a stunning online store to showcase your downloadable products, VW Themes offers a variety of beautifully designed themes tailored for such businesses. Themes like the Stock Images WordPress Theme, Ebook Store WordPress Theme, Software Company WordPress Theme, and SAAS Services WordPress Theme are perfect for digital product stores. These themes are optimized for performance and user experience, ensuring your store runs smoothly while enhancing customer satisfaction. Start selling your digital products today and watch your online business thrive with WooCommerce and VW Themes!


