Are you running a print-on-demand business and looking to expand it online? This is a highly viable idea, as it will help you grow your venture and allow more users to learn more about it. Create a Print on demand online store is the right way.
The print-on-demand business is getting faster as people are more interested in getting customized prints on objects. Whether it may be t-shirts, mugs, bag packs, caps, and more. The idea of getting customized prints has taken up a lot of space nowadays. It can be easier for users to get their digital prints with a single click.
Your print-on-demand business can reach on the web when you urge to create a website. Creating a print on demand online store is not as crucial a task as you think. For some, it may be, but we are here to make it much easier for you. This blog will give an in-depth poster about the print-on-demand business and more. Also, there is a step-by-step guide on how to create a Dropshipping with WordPress website for a print-on-demand business.
What is a print-on-demand?

Print on Demand (POD) is a business model and printing technology where products (typically apparel, books, home decor, etc.) are only printed and manufactured once a customer orders. This eliminates the need for holding inventory in advance and allows businesses or individuals to sell custom designs without upfront costs. The seller does not need to purchase or store items in bulk. Once a customer orders, the item is produced and shipped directly to them.
POD services often allow sellers to create custom designs (e.g., graphics, artwork, or text) that can be applied to products like t-shirts, mugs, phone cases, or books. Since items are only made when purchased, sellers don't face the financial risk of unsold inventory. Many POD platforms integrate with online marketplaces (such as Etsy, Amazon, or Shopify) and handle everything from production to shipping.
What is the use of print-on-demand?
Print-on-demand (POD) has a variety of uses, especially for entrepreneurs, artists, authors, and small businesses. It offers flexibility and efficiency in producing customized products without the need for upfront investments or inventory. Here are some of the key uses of POD:
- Sell Art Works: POD allows creatives to sell their artwork on physical products such as t-shirts, mugs, posters, or phone cases.
- Merchandise: Influencers, YouTubers, or small businesses often use POD to create branded merchandise for their followers, such as custom clothing, accessories, or home decor items.
- Book Publishing: POD is highly popular for self-publishing books. Authors can print books only when they receive orders, avoiding large upfront printing costs.
- Photographers: Independent magazine creators and photographers can use POD to offer limited-edition prints or collections of their work without committing to large print runs.
- Best For Entrepreneurs: POD allows entrepreneurs to run e-commerce stores selling custom products without handling production or warehousing.
- Custom Brand Products: Businesses can create custom-branded products like T-shirts, mugs, or notebooks for employees or events without buying in bulk. POD makes it easier for small businesses to access corporate merchandise at a low cost.
- Custom Designs: POD enables customers to personalize products such as T-shirts, mugs, and home decor items with custom text, images, or designs, making it a great option for personalized gifts.
Because products are only made when ordered, POD can be more environmentally friendly by reducing overproduction, excess inventory, and waste that would otherwise occur in traditional bulk manufacturing.
Steps To Create a Print on Demand Online Store
Now, we have finally reached the step where you will meet a step-by-step guide on How to Create a Print on Demand Online Store.
1. Get a domain

The most basic fact when creating any sort of website is to get a domain and a hosting service. Without these two basic elements, a website cannot stand on the web. This is where the website owner needs to be professional in terms of choosing the right domain and hosting service.
But first, let me know about the domain, which is the unique addressing element of your website on the internet. The domain starts with “www” and usually ends with ".com," ".in,” and ".co." The web is full of the finest domain services, giving the finest domains at cost-effective prices. You can find it on GoDaddy, Namecheap, Hostinger, and Bluehost.
While getting a domain provider, make sure you select a domain relevant to your niche. It should be easy to understand and precise. Don’t make use of complicated words or special characters for the domain. If you are facing problems while choosing a domain name then you can visit our beginners guide on how to pick a domain name.
2. Hosting Service

A hosting service provides a platform on which your website runs through the internet. It provides a separate server that stores your site’s data files and more details properly. Your hosting service needs to be professional, as it can impact the security, speed, and reliability of your site. You must be well-known with Best web hosting for WordPress and providers like Bluehost, Hostpapa, GoDaddy, and more.
And while choosing the right hosting service, make sure it supports the latest versions of PHP and HTTPS.
And interestingly, some certified hosting services come with a free domain for an entire year. This makes it easier to choose one of the hosting services with domain integration. And here, we have the Bluehost hosting service that comes with a free domain for an entire year. For any of the Bluehost plans you choose, one year of the domain is free with it.
So to proceed with Bluehost, visit the official website homepage and tap the Get Started button. Once you have tapped the Get Started button, the next page will show you the list of available plans with the domain. You can choose from four plans, starting at $3.95 per month. Once you have selected the plan, the next page will ask you to choose a domain. After the domain, the next step is to complete the checkout process by filling out the account details. Once you have done all this, your Bluehost account will be created, and you can access the dashboard. After you have created the account, an email with the details of successfully purchasing the service will reach you. Also, the mail will hold the essential login credentials for the WordPress login.
3. Install WordPress

Finally, when you have the right hosting and domain, it is now necessary to install WordPress. Well, Bluehost makes it the easiest task when it comes to installing WordPress. Just a single click is required, and there you go with the WordPress installation.
Visit the email you received after purchasing the Bluehost service. There you can find a link allowing a single-click WordPress installer.
Simply tap on the link, and Bluehost will automatically install WordPress for you. This is the simplest method for non-tech users or beginners.
You have a blank WordPress website ready with you to make it yours. What next? You need a perfect theme for your print-on-demand website.
4. Choose a Premium WordPress Theme
You have reached that point in web design where we need to play smart for your print-on-demand website. That is the Premium WordPress themes selection. A theme can place your website on the right platform in the right position. Theme selection is one of the most vital and heaviest steps you need for web design. A theme is a collection of templates, CSS files, and plugins to decorate any of your niche websites. WordPress is a complete sea full of notorious and commendable themes to choose from for your site. You can get so many themes for your niche website, and the numbers are rising every day.
The demand makes WordPress experts more focused on launching themes for every niche. With this, multiple platforms are there selling their best and most qualified themes for any of your niche websites. For this blog, we are focusing on create a print on demand online store. And no doubt, you will come across the best platforms selling their themes on the market.
And no doubt, you will come across the best platforms selling their themes on the market. To make this easier for you, we have VW Themes on our top theme-selling platforms list. And here are some of the best themes you can have for your print-on-demand website.
A. Clothing Store WordPress Theme

Create a Print on demand online store requires a solid theme to stand out. Bring your clothing store on the web with this most qualified and stylish clothing store theme. It brings out the best in your fashion store by raising print-on-demand services. You can connect with more customers when you put your store on the web. This theme is perfect for playing your business game without any codes. Visit the single-click demo importer and get your website ready with enough customizing elements to count.
B. Fashion Designer WordPress Theme

Searching for the best themes to create a Print on demand online store? If yes, then this Fashion Designer Theme is your tool to make your fashion thing a bigger brand on the web. The theme holds potential with its intuitive design elements and templates. The theme even allows you to expand your fashion senses to print-on-demand products. It lets you fully customize your site, which you must have dreamt of. It has a completely user-friendly interface with a responsive design. Woocommerce is the most promising element that brings out the essence of your business.
C. Boutique WordPress Theme

Bringing on this Boutique WordPress Theme to create a Print on Demand Online Store. And as a boutique owner, you need to manage so much stuff out there. But this can be a thing of no time when opting for a personalized website. For this, you need this premium boutique WordPress with the motive to strengthen your business on the web. Also, the theme brings you a lot more than you have dreamed of for your business. You can expand your boutique business by taking print-on-demand orders with easy online payment gateways. The theme is easy to use and can be customized for advanced levels. It holds the most dignified and creative template designs with responsive design.
D. Market WordPress Theme

With the idea to create a print-on-demand online store, you can go for this market WordPress theme. This is where you can start boosting your business with a powerful website without many requirements. The theme is made with a multipurpose idea to hold every e-commerce business on board. Its interface is built with thinking beginners in mind. You can have your e-commerce business without using codes or meeting developer needs. The theme gives you a single-click demo importer that automatically designs a website for you. Also, the theme has a fully responsive design along with integrating Woocommerce.
E. Watch Store WordPress Theme

Watches too are setting their spaces when it comes to create a print on demand online store. If you are into such a venture, you can have this exposure on the web using the Store Store theme. The premium Watch Store theme has its place among the best-selling and most creative e-commerce themes. This is where you can make your watch store a remarkable one on the web. The theme brings you the finest and most customizable theme elements to cater to. No matter when you have zero coding skills, the theme is user-friendly for you. Also, it has some unique and advanced elements for your e-commerce business. Woocommerce makes a huge contribution to building a great foundation for your business.
5. Install The Theme on WordPress

So, the above 5 themes can make your print-on-demand website the best on the web. For now, we assume that you have chosen Fashion Designer WordPress. So, let’s proceed with installing the theme on your website. After your purchase is completed you would have a Theme file and Licence key for the theme with you.
Now, head back to the WordPress dashboard and tap the Appearance tab.
- Press the Themes tab and then the Add New option.
- On the next page, tap the Upload Theme button, and you will now need to upload the zip file from your device.
- Once the file is uploaded, tap the Install button. You will reach the next page with the activate link to hit.
- Once you have activated the theme on your site, it will take you to the homepage of the theme. Wherein you can access the entire theme only after entering the license key.
- The license for the theme is provided after you have purchased the theme. Once entered, you will now see the next screen with a Start Now button.
Simply tap it, and you will now be asked to install the necessary plugins for your site. Plugins like Woocommerce, Stripe payments, Contact Form 7, and more will be added. Tap the Install plugins button at the end, and all the plugins will be installed one by one on your site. After this, on the next screen, you will demo importer options with a single click to build an automatic website. You can choose to customize using the block editor or the native customizer. And this is how you have a rough website ready to customize. If you need a detailed guide on how to Install these themes then you can visit our blog on "How to Install WordPress Themes"
6. Create an account with Printful

We have reached the step where you need to have an account to proceed for create a Print on demand online store. Now, what is Printful? This thought may arise in your mind. Printful is a highly qualified and certified tool to possess print-on-demand stuff on your site. This is the tool where you can run your POD websites with a wide range of products to design. Moreover it uses Woocommerce Dropshipping Plugin in order to connect Printful and Woocommerce.
So to begin using Printful, you must first create an account on it:
- Visit Printful’s site, click “Start Selling,” and complete signup by entering your details and agreeing to terms.
- Answer the questions, then access the Printful dashboard.
- Confirm your email via the link sent to you.
- Create products by selecting “Product Templates,” then hit “New Template.”
- Choose a product (e.g., a t-shirt) to print on.
- Customize your design, drag it onto the product, and adjust text, font, color, and placement.
- Use tabs to apply designs to different areas of the t-shirt.
Once you are done with the customization, tap the Continue button. After this, you need to provide a title and save your template under the Product Templates tab. It's time to set the billing structure of the template product you have created. To do this, again visit the dashboard, and you will find the billing section. By clicking on the “Add New Billing Method” tab, you can add any of the billing methods to it.
7. Connecting Printful to Your WordPress Website
Now is the time when you need to connect Printful with your WordPress website. Also, you have WooCommerce installed and activated while setting up the theme.
You already have a website ready with you, so to connect Printful with your site, it is needed to enable the Legacy TEST API feature under Woocommerce.
- Visit the Settings tab under the dashboard area of your site and switch to the Advanced tab.
- The Advanced tab has only one option to enable the “Enable the Legacy REST API” option.
- After that, you need the plugin “Printful Integration for Woocommerce." Simply get that plugin installed and activated. After activation, you will see the Printful tab appear in your dashboard area.
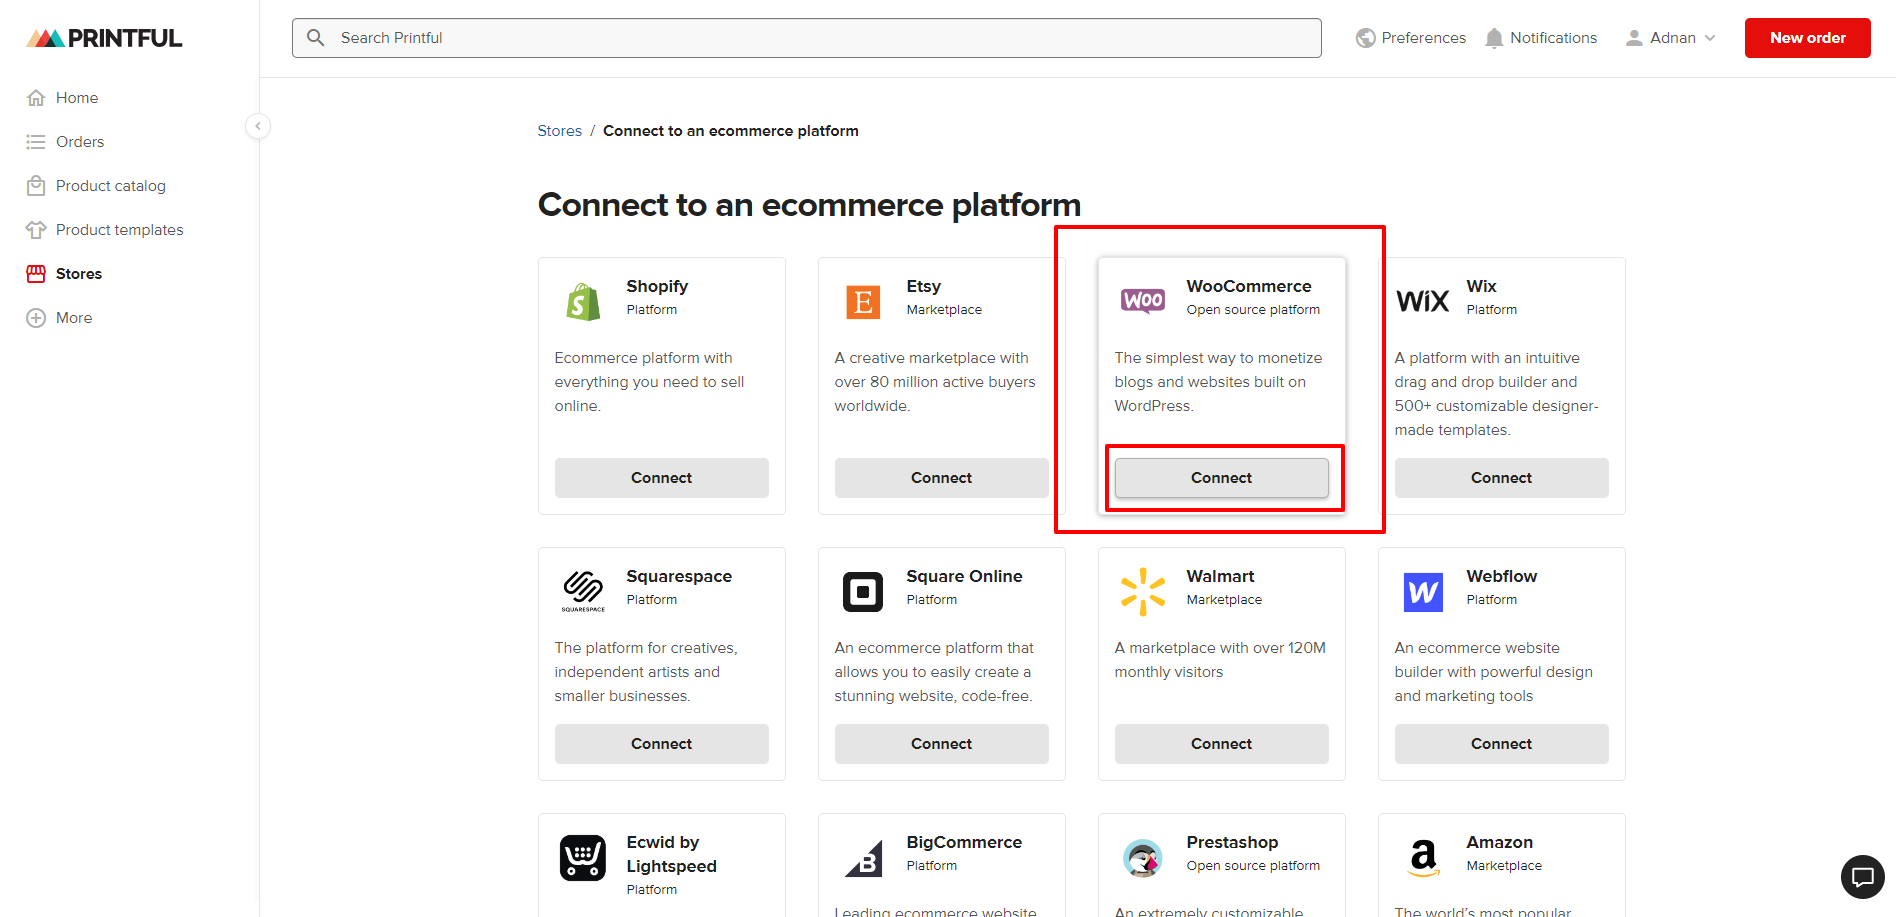
- Simply hit the Printful option, and on the right side of the page, tap the Connect button.

- After this, WooCommerce will ask you to approve the connection by hitting the Approve tab. After this, keep following the next screen prompts to connect your account.
- After all this, a message will be delivered to you informing you that data is being synchronized, and within a minute, the store will be connected.
- Once the store is connected to the Printful account, you need to add the Printful products to your store.
8. Add Products To Printful

After connecting Printful with WooCommerce, adding products to your store is a streamlined process. First, log into your Printful dashboard and navigate to the "Product Templates" section. Here, you can select the type of product you wish to sell, such as t-shirts, hoodies, or mugs. Once a product type is chosen, customize it by uploading your logo, design, or artwork. Printful provides options to adjust the size, position, and layout of your design on the product. After finalizing your design, you’ll enter essential product details like the product name, description, and pricing. Printful also allows you to set up variants such as different colors or sizes for your product.
Once you’re satisfied with the product details, Printful automatically syncs the product to your WooCommerce store, making it available for sale. You can manage your inventory, set pricing, and handle shipping options from the WooCommerce dashboard. Additionally, any changes made in the Printful dashboard, such as updated designs or new products, will automatically reflect in your WooCommerce store.
After syncing, you can further optimize the product listings, adjust tax and shipping settings, and manage customer orders through WooCommerce. Printful will handle the production and fulfillment, ensuring a seamless process from product creation to delivery.
9. Add Payment Gateways To Your Website

Adding payment gateways to while you create a print on demand online store it is a crucial step to ensure smooth transactions for your customers. A payment gateway allows you to accept payments securely online, whether through credit cards, PayPal, or other digital wallets. To integrate a payment gateway, choose a reliable option compatible with your website and VW Themes. WordPress offers easy integration with popular payment gateways like WooCommerce Payments, Stripe, and PayPal. After installation, configure settings such as accepted currencies, payment methods, and security measures. Testing the gateway is essential to verify that it works seamlessly before going live.
To integrate payment methods on your WordPress site, follow these steps:
- Install WooCommerce: Navigate to "Plugins" in the WordPress dashboard, search for WooCommerce, and install it. Activate the plugin.
- Set Up WooCommerce: Go to WooCommerce > Settings, and configure your store details like currency, location, and selling options.
- Add Payment Gateway: Under the "Payments" tab, select your preferred gateway (PayPal, Stripe, etc.), and enable it.
- Configure Payment Settings: Add required details like API keys, and customize settings for each payment method.
- Test Payments: Ensure the payment methods function properly through test transactions.
The most popular payment gateways is the "PayPal", If you too are using paypal as you go to payment gateway then here is the detailed guide to setup your PayPal Payment Gateway.
10. Try and Test the Process on Live Website

The final step in creating your print-on-demand website is to test the entire purchasing process on your live site. This ensures that everything from product selection to payment functions smoothly. Place a test order to check if your products are displaying correctly, shipping options are accurate, and transactions are processed without issues. Also, confirm if your automated emails for order confirmations are working. Testing on the live site helps identify any bugs or user experience problems, ensuring that your customers have a seamless and reliable shopping experience.
Conclusion
Super easy, right? Creating a print-on-demand website is an easy task for you now. As you went through the above blog, you found a complete guide on how to create a print-on-demand website. In the Above guide we have suggested some of the our Premium WordPress themes that have prebuild templates for each pages and comes with one-click demo importer, We suggest that If you are a Web design agency or a Web developing company then apart from having separate themes for different niches you can go for Our exclusive WP Theme Bundle. This package consist of 240+ Premium themes.

Moreover with our on-going WordPress Halloween Deals you avail these Premium themes and our WordPress theme bundle at extra discounts. Visit our official Website "vwthemes.com" and grab the deals.
A print-on-demand website is a platform where products are printed and shipped on demand. Customized printing is so popular today that such businesses are reaching greater heights in the web world. Customized printing earlier was just limited to t-shirts, but now it is widespread on almost every product. You can use mugs, caps, backpacks, watches, and more stuff for custom printing. And then come the print-on-demand businesses. Such business owners can bring their brands to the web, and you just need to refer to the above blog. We have made a comprehensive guide for you to know about how to create a print-on-demand website easily. You will know the best benefits and more about the print-on-demand business.


