Introduction:
In the modern digital age, e-commerce has grown into an essential component for many businesses. Due to the rise in online transactions, businesses now more than ever need to be able to manage and track their purchases efficiently. WooCommerce is a popular platform for managing online orders. It is a powerful WordPress plugin that enables companies to set up and manage an online store. Nonetheless, many businesses use Google Sheets to get a comprehensive view of their data on sales due to its versatility and ease of use.
This integration will not only save you time and effort but also give you helpful information about your company's process. Let's get started and see how much this simple procedure may improve your online
Exporting WooCommerce Orders to Google Sheets
Looking for a way to streamline your WooCommerce store management? Exporting your order data to Google Sheets is a powerful solution! With Google Sheets, you can easily analyze sales trends, track customer information, and gain valuable insights into your business.
Before we dive into the tutorial, a special shoutout to VW Themes! They offer a collection of the best premium WordPress themes with sleek designs and feature-rich functionalities. Whether you're looking for a minimalist aesthetic or a feature-packed powerhouse, VW Themes has the perfect theme to elevate your WooCommerce store. Visit VW Themes today and discover a world of design possibilities!
Now, let's get started with exporting your WooCommerce orders to Google Sheets...
1. Create a Google Sheet
Make the following information tables in Google Sheets:
- Open Google Sheets to start creating new spreadsheets.
- The table's column titles ought to be arranged in the very first row.
- Enter the information for each row in the appropriate columns.
- Focusing on the data you want to include in the table.

After it is created, you can modify the font, cell colors, and other formatting options in your data table. You may also arrange and filter your data to make analysis easier.
2. Insert Details in Your Table:
It's time to start entering data into the spreadsheet you created and prepared. Here are some suggestions to assist you in adding information to the table:
Use clear and informative column headings to make it easy to understand what each column reflects. Make sure the data is consistently structured to facilitate sorting and filtering. Use formulas to compute numbers instantly based on each cell in your table.
Use data validation to ensure that the information agreed upon this table complies with specific demands. With free data connections and a Google Sheets add-on like Coefficient, you could tenfold speed up your data workflows when you're copying, pasting, and physically importing data from another platform.
Multiplier provides data connections for a wide range of systems, including databases and data warehouses such as Snowflake and PostgreSQL, analytics tools for marketing such as GA4, Google Search Console, and advertising platforms.
If you want the tables to always be current each time you export Woocommerce orders to Google Sheets with Coefficient, you can decide that you want the information updated on a regular basis.
3. How a Table Is Formatted:
You can format your table after you've created it to enhance analysis and readability. The following suggestions can assist you in formatting your table: Strong or italicized text should be used to draw emphasis to important information.
Use different font sizes or colors to distinguish between different types of data. Use borders to create divisions across the different areas of your table.
Use conditional styling to draw your focus to cells that satisfy specific requirements. Your table will be easier to follow and understand, as well as more visually appealing, if it is written in a straightforward manner. You will see an initial function called myFunction() in the Apps Script editor. We'll use our software in place of this.

Go to Tools and select Script Editor option.
Enter the following code in the blank space -
function doGet()
{
var sheet = SpreadsheetApp.openById('YOUR_SPREADSHEET_ID'). getActiveSheet();
var data = sheet. getDataRange(). getValues();
var htmlOutput = HtmlService.createHtmlOutput('<table border="1">');
for (var row = 0; row < data.length; row++)
{
htmlOutput.append('<tr>');
for (var col = 0; col < data[row].length; col++)
{
htmlOutput.append('<td>' + data[row][col] + '</td>');
}
htmlOutput.append('</tr>');
}
htmlOutput.append('</table>')
return htmlOutput;
}
This code contains: The primary function of our online application doGet(). It creates a table in HTML to show the data after retrieving Woocommerce orders to Google Sheets. Change 'YOUR_SPREADSHEET_ID' to the ID associated with the Google Sheet whose data you would like to get.
4. Launching the Web-Based Programme:
Click the floppy disc representation and use your keyboard shortcuts (Ctrl + S on Windows, Cmd + S on Mac) to save the code.
Next, click the symbol of the floppy drive again. This time, select the project edition by giving it a name in the "Version" box (e.g., "v1").
5. Deploying the Script:

Following the menu item "Publish" selection. Go with "Deploy as web app."

During the deployment discussion: From the "Execute the app as" menu, choose "Me". Select "Anyone, even anonymous" encompassing those who maintain a degree of anonymity.
Select "Update" You will be prompted to grant permissions for your script. Grant the necessary permission. When the installation is complete, a URL appears under "Current web app URL".

This is the internet application's URL. If you mouse on it, a new tab will appear with the application you are using.
6. Examining your web page:
Go to the URL that you were provided in the preceding step. A table with the Woocommerce orders to Google Sheets should appear.
Excellent work! You've just finished creating and distributing your first Google Apps Script app on the web. Users are able to add additional HTML, CSS, and JavaScript to improve the functioning and appearance of your web application.
7. Configuring the WooCommerce webhook:
Select the Webhooks tab after logging into the WordPress admin area. You must first log in as an administrator to your WooCommerce website. Following that, from the WooCommerce > Settings menu, select Advanced. Next, choose the Webhooks item from the drop-down list.
Remember that with WooCommerce versions less than 3.4, Webhooks are accessible via WooCommerce > Settings > Webhooks. Choose the button that displays to add and create a webhook.

Selecting webhooks from the menu will bring up a list of blank webhooks. It suggests that Webhooks are not implemented on your WooCommerce website at this time. Choose Add Webhook or Create a New Webhook to begin going.
Getting Complete WooCommerce Order Details:
The above fetched Woocommerce orders to Google Sheets is very less, so for fetching the complete detail you need to follow the process given below. The field that will be fetched are listed below:
- Order Number
- Order Date
- Order Status
- Product Name
- Product Quantity
- Product Total
- Order Total
- Billing Email
- Billing First name
- Billing Last name
- Payment Method
- Shipping Method
- Shipping charges
Add the below code to your script in order to retrieve complete order details -
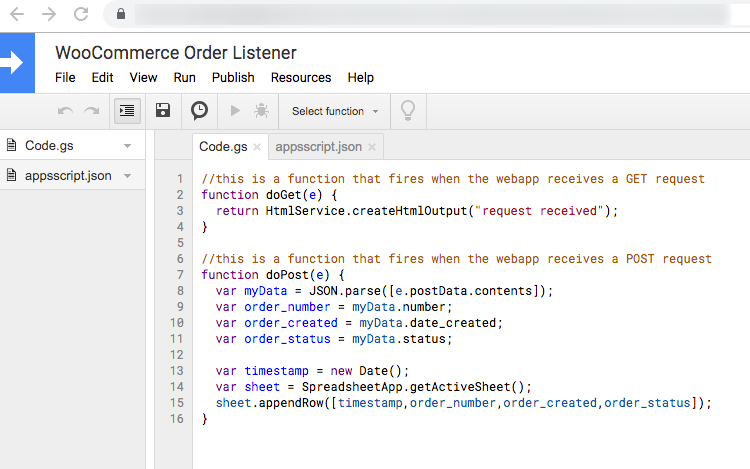
//this is a function that fires when the webapp receives a GET request function doGet(e)
{ return HtmlService.createHtmlOutput("request received"); }
//this is a function that fires when the webapp receives a POST request function doPost(e)
{
var myData = JSON.parse(e.postData.contents);
var order_number = myData.number;
var order_created = myData.date_created;
var order_status = myData.status;
var product_name = myData.line_items[0].name;
// Assuming there's at least one line item
var product_quantity = myData.line_items[0].quantity;
var order_total = myData.total;
var billing_email = myData.billing.email;
var billing_first_name = myData.billing.first_name;
var billing_last_name = myData.billing.last_name;
var payment_method = myData.payment_method_title;
var shipping_method = myData.shipping_lines[0].method_title;
// Assuming there's at least one shipping method
var timestamp = new Date();
var sheet = SpreadsheetApp.getActiveSheet();
sheet.appendRow([timestamp, order_number, order_created, order_status, product_name, product_quantity, order_total, billing_email, billing_first_name, billing_last_name, payment_method, shipping_method]);
}
Upon placing an order, the sheet will start populating as shown below:
This is the most efficient method to export your Woocommerce orders to Google Sheets. Orders are exported in real-time without additional effort when a new order is placed.
Conclusion:
By following these quick steps, you've successfully automated the transfer of your Woocommerce orders to Google Sheets. This allows you to easily analyze your sales trends, track customer information, and gain valuable insights into your business. Remember to customize the exported data to fit your specific needs, and explore the scheduling options to keep your Google Sheet up-to-date.
For those looking to enhance their WooCommerce store's visual appeal, VW Themes offers a comprehensive collection of premium themes and WP theme bundle. These themes are designed to be not only beautiful but also functional, providing a seamless shopping experience for your customers. Visit VW Themes today and discover the perfect theme to elevate your WooCommerce store!
Blogs Categories
- AI Tools
- All
- Best Website Themes For WordPress
- Best WordPress Templates
- Best WordPress Themes 2020
- Blog
- Buy WordPress Themes
- Fansite WordPress Themes
- free wordpress templates
- Google Updates
- Hosting
- Hybrid WordPress Themes
- Marketing
- Mobile App
- Premium WP Theme
- Responsive WordPress Themes
- SEO
- Smoothie WordPress Theme
- Social Media
- Themes for WordPress
- Tutorials
- VW Updates
- Web Design
- Web Development
- Website Builder
- Website Security
- Website Templates For WordPress
- WordPress Errors
- WordPress Plugin
- wordpress plugins
- WordPress Premium Theme
- WordPress Sale
- WordPress Themes
- WordPress Website Themes
Podcast WordPress Theme (Audio Podcast 2.0)

Latest WordPress Themes


Buy All our Premium Themes just at $99
