Do you want to encourage email marketing on your WordPress website? You might be looking for the best email marketing plugins and email marketing templates, right? Or you might interact with the best membership plugins for WordPress too.
But WordPress has something more than this. We are talking about the Mailchimp platform, which can be integrated with WordPress.
Integrating Mailchimp with WordPress can be a game-changer for building and nurturing your audience. By connecting Mailchimp’s powerful email marketing capabilities directly with your WordPress site, you gain the ability to seamlessly collect visitor information, create personalized marketing campaigns, and automate engagement. This integration is particularly useful for bloggers, businesses, and e-commerce sites aiming to grow their email lists, target audiences effectively, and drive conversions.
This guide will tell you how to integrate Mailchimp with WordPress and some more exciting insights about it.
Benefits of Integrating Mailchimp with WordPress
Integrating Mailchimp with WordPress can be a powerful way to grow your audience, streamline marketing efforts, and improve engagement on your website. Here are the key benefits:
- Automated Email Marketing: Mailchimp allows you to set up automated email campaigns, such as welcome emails, lead nurturing sequences, or re-engagement campaigns.
- Easy Signup Form Integration: Mailchimp provides customizable signup forms that can be embedded directly into WordPress pages, posts, or sidebars. Subscribing to the email list becomes way more easy for the visitors coming on your website.
- Enhanced Analytics and Tracking: By integrating Mailchimp with WordPress, you can track key metrics like sign-up rates, open rates, click-through rates, and overall engagement.
- Increased Lead Generation and Sales: With forms, pop-ups, and call-to-action buttons, you can create multiple touchpoints encouraging visitors to subscribe, improving your chances of converting leads.
- Enhanced Social Media Integration: Mailchimp lets you easily share newsletters and email campaigns directly from your WordPress site on social media, broadening your reach.
Some more Recommended Plugins to Integrate Mailchimp with WordPress
Integrating Mailchimp with WordPress is a powerful way to capture leads, manage subscribers, and automate email marketing. Here are some of the best WordPress plugins to integrate Mailchimp with WordPress:
MC4WP: Mailchimp for WordPress

MC4WP: Mailchimp for WordPress is a powerful and easy-to-use plugin that helps WordPress site owners harness the full potential of email marketing through seamless integration with Mailchimp, one of the leading platforms for email campaigns. This plugin enables users to grow their email lists with customizable signup forms that blend beautifully with their Website's theme, allowing for simple setup and maximum appeal. If you are looking for Premium WordPress Themes for your website to look professional then you can consider VW Themes as the pioneer marketplace to buy a premium theme.
This plugin provides a flexible yet straightforward form builder that requires no technical expertise, making it ideal for beginners and experienced marketers alike. Not only can you capture leads effectively, but MC4WP also offers compatibility with popular plugins like WooCommerce and Contact Form 7, allowing for more options to convert visitors into subscribers.
Mailchimp form by MailMunch

Mailchimp Forms by MailMunch is a popular plugin that makes it easy to add customizable sign-up forms on your WordPress website, specifically optimized to sync with your Mailchimp account. It’s designed to help increase your email subscribers and is ideal for capturing leads and running targeted email campaigns. The plugin includes a drag-and-drop editor that makes it easy to build and customize forms without coding. MailMunch forms are responsive and optimized for mobile devices, ensuring a seamless experience for all visitors.
Ninja Forms by Mailchimp

The Ninja Forms-Mailchimp Extension allows you to integrate Mailchimp with Ninja Forms, one of the most popular WordPress form builder plugins. With this extension, you can seamlessly add subscribers to your Mailchimp audience directly from forms created with Ninja Forms, giving you flexibility and control over how and when subscribers join your email list. The extension connects Ninja Forms directly to Mailchimp, allowing you to automatically send form data to your Mailchimp audience. You can set up multiple forms to map to different Mailchimp audiences, allowing you to segment subscribers based on their signup source.
Optinmonster

OptinMonster is a powerful lead generation and conversion optimization plugin that integrates with Mailchimp and other email marketing services. It’s widely used for creating high-converting opt-in forms and pop-ups to grow email lists, promote offers, and boost site engagement. OptinMonster is well-suited for marketers and businesses looking to maximize their website conversions. OptinMonster’s intuitive drag-and-drop editor allows you to create and customize forms without coding. OptinMonster proves to be one of the best in class email marketing plugins for WordPress that offers real-time analytics to track views, conversions, and conversion rates.
How to Smoothly Integrate Mailchimp with WordPress
Let’s get initiated with how to integrate Mailchimp with WordPress with this step-by-step guide. Here, we are using the plugin “MC4WP: Mailchimp for WordPress." To get this done, we need to follow simply two steps:
Step 1: Setup Account on the Mailchimp website

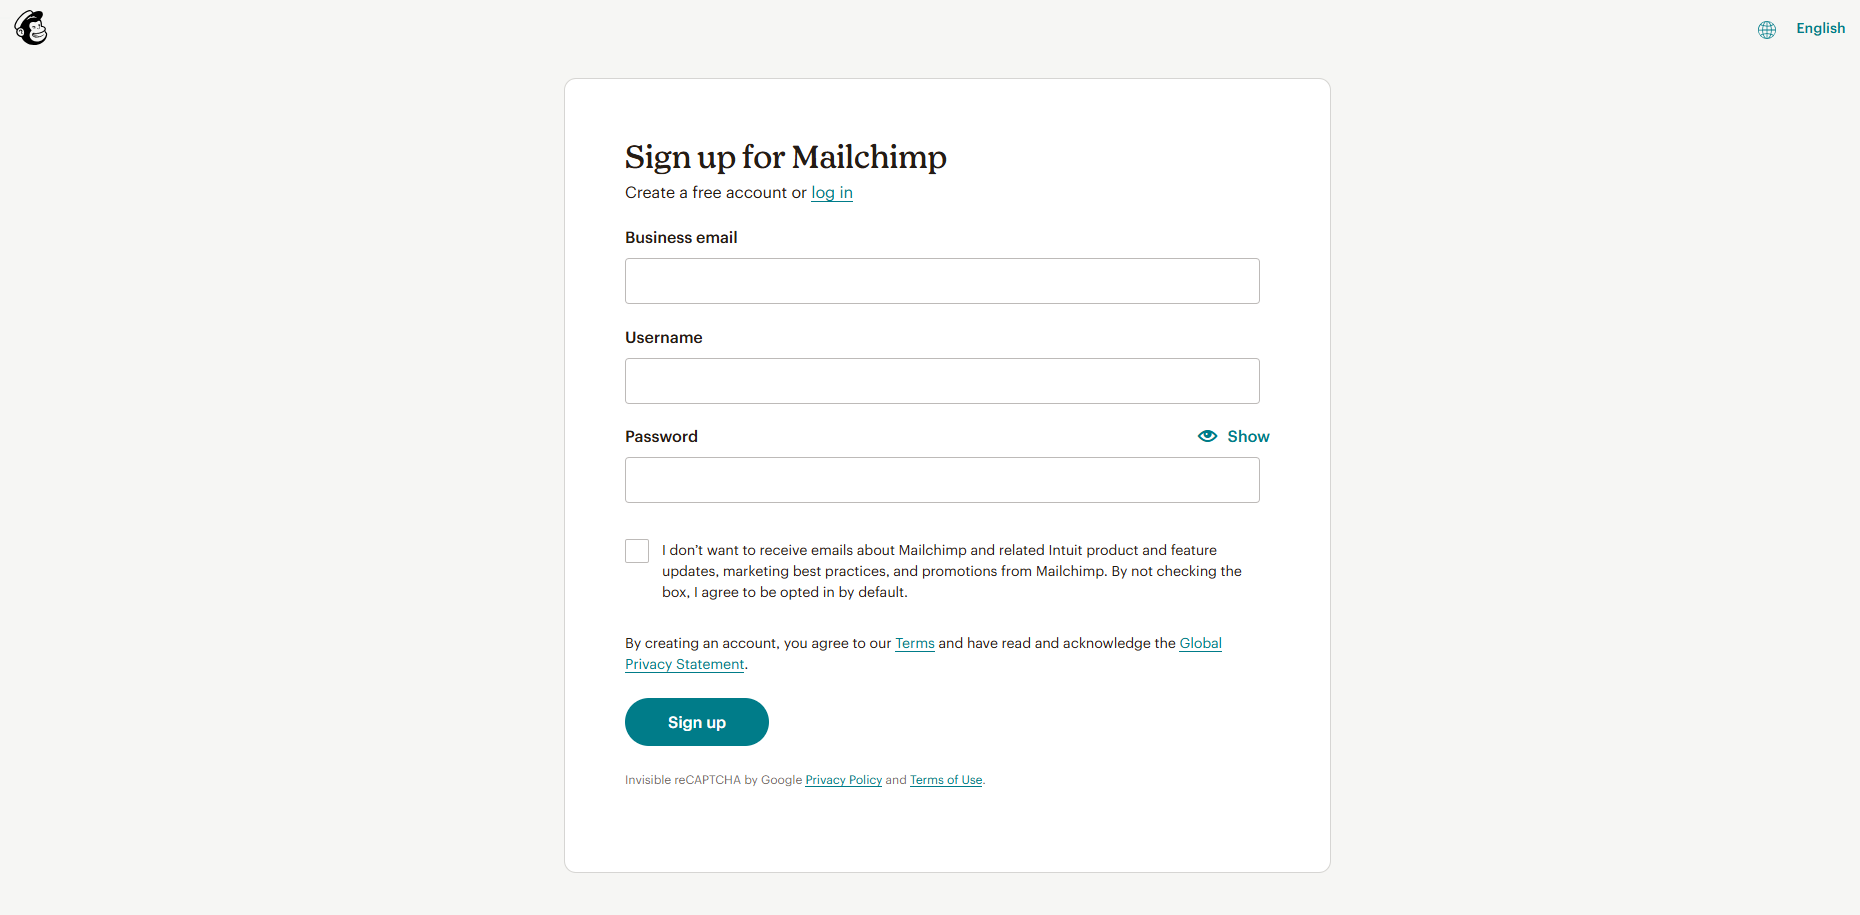
- The first step falls when you need to create and set up an account on the Mailchimp website. For this, visit the Mailchimp website and tap the Sign Up button.
- The next page is the pricing page, where again, you need to tap on the Signup button.
- Next, you need to set up an account using email or simply set it up using Google. Enter your email address and then the account credentials, like username and password.
- You need to simply follow the upcoming prompts as you move ahead.
- Once your account is created, you will be taken to the Mailchimp dashboard area, where you need to hit the Create button.
- Next, go for the “Embedded Option” under the “Signup Form” option.
A new screen will appear where you need to give a name to your form and then tap the Begin button. After this, you can either customize the appearance of your form or simply hit the Continue button to move ahead. Your form is ready now. When your form is ready, you need to test whether it is working well or not. To do this, you need to embed the form code created earlier. But first, it is vital to create a new post in the WordPress dashboard.
When you reach the blank post screen, tap the “+” icon to add a block to your new post. Here, simply choose the “Custom HTML” block. Simply use the drag-and-drop feature to add to your post. Next, you need to paste the copied embed code into the HTML block. Now, as you preview your form, there will be a Mailchimp form in front of you. You can enter an email ID in the form and click on the subscribe button. You can see that when you tap the Subscribe button, no action will be taken as the website is not connected with the form right now. This takes you to follow step 2.
Step 2: Install the “MC4WP: Mailchimp for WordPress” plugin and generate the API key

The next step calls to generate the API key, and for this, it is needed to install the “MC4WP: Mailchimp for WordPress” plugin on your website.
- To install this plugin, you need to first visit the Plugins tab under the Dashboard area and then choose the Add New option.
- The next page is the plugin directory, where you need to search for the “MC4WP: Mailchimp for WordPress” plugin.
- Once you get it, hit the Install and then the Activate tab.
- After this, the plugin with the name “MC4WP” will appear under the dashboard area of your website. Simply tap to reach the plugin page, and on the page under the blank space of the API Key, tap on the link “Get your API Key here.”

- On the next page, hit the “Create a Key” button, and then on the next page, enter a name for your API and hit the “Generate API“ button.
- It will generate an API key that you need to copy, or you can simply hit the “Copy to Clipboard” button.

- Move back to the plugin, paste the API key there, and save the changes when you are done.

- You can now see the status on the plugin as “Connected” with a green-coloured button.
Now, you need to head back to the form that was created and hit the Subscribe button. And then you can see the emails have been added to the Mailchimp account. MailChimp much more than just email marketing which you can further discover among its features, mail chimp is among the top email marketing platforms that comes with exceptional functionalities in order to provide your website a great exposure. This is how we can integrate Mailchimp with WordPress, but can we integrate it with Woocommerce too? Yes, let’s check it out.
How to Integrate Mailchimp with WooCommerce?
Integrating Mailchimp with WooCommerce allows you to automate email marketing, track customer behavior, and send targeted campaigns based on customer actions on your WooCommerce store.
Here’s a step-by-step guide:
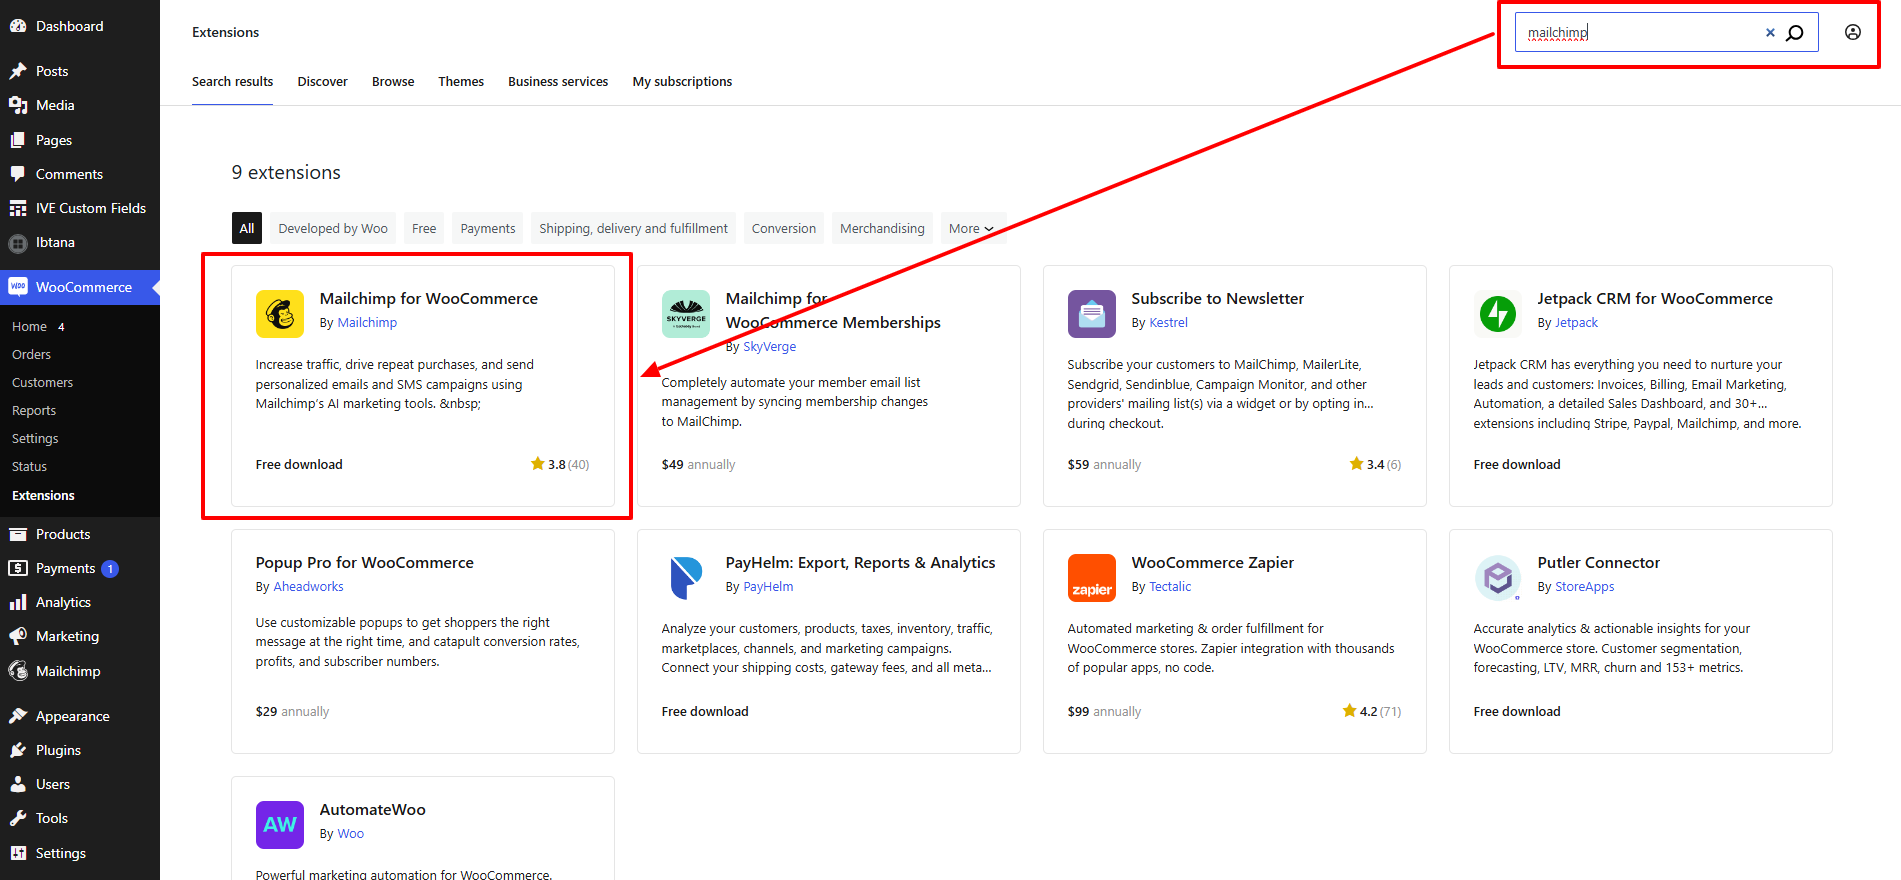
- In your WordPress dashboard, go to Plugins > Add New.
- Search for “Mailchimp for WooCommerce.”
- Install and activate the plugin developed by Mailchimp.
- After activation, you’ll see a new menu item in WooCommerce or under Settings.
- Go to WooCommerce > Extensions > Mailchimp in your WordPress dashboard.

- Click Connect Account.
- Log in to your Mailchimp account (or create one if you don’t have it already).

- You’ll be prompted to connect WooCommerce to your Mailchimp account and select the audience (email list) you want to sync.
- Choose the audience in Mailchimp where you want new WooCommerce customers to be added.

- Enable E-commerce Data Sync to allow Mailchimp to collect data on orders, product views, and cart details.
- Enable the Double Opt-In option if you want customers to confirm their subscription to your list.
You can even customize the Woocommerce checkout for opt-in. For this, go to WooCommerce > Mailchimp settings. In the opt-in settings, choose if you want to show an opt-in checkbox at checkout. Customize the text that will appear beside the checkbox. Once everything is set up, the plugin will automatically begin syncing your WooCommerce store’s data to Mailchimp. This data can include customer information, purchase data, and other e-commerce insights. Test the integration by making a test purchase and checking if customer data appears in Mailchimp. If you encounter any issues, go to WooCommerce > Mailchimp > Troubleshooting for options to re-sync or reconnect your account.
Conclusion
This is how you can easily integrate Mailchimp with WordPress, along with unlocking the best benefits. By integrating Mailchimp with WordPress, you’re setting up a system that combines data collection, audience segmentation, and email automation to drive sustained engagement and sales. With the right plugin and setup, your WordPress site becomes a gateway for building meaningful connections with your audience and growing your email list effectively.
Integrating Mailchimp with WordPress provides a dynamic way to grow and nurture your audience. By streamlining data collection, segmenting subscribers, and automating campaigns, you create a powerful marketing engine that works around the clock to engage and convert leads. The tools and plugins available offer varying levels of customization and functionality, making it easy to find the perfect fit for any site, whether you run a blog, business, or e-commerce store.


