Introduction
Taking your niche on digital grounds is itself a great decision to unlock good prospects. A website can help your niche build a strong foundation and be a key to success on the web.
People are getting engaged with a great online presence in this fast-moving world. So, overall, building a website for your niche is a win-win situation. But that’s not the only thing; there is another side to building a website. People, most of the time, just skip this as they find web design none of their cup of tea. Well, that seems obvious, but not when you have this blog with you.
A website is way better when you have chosen the right platform. And among the many web design platforms rolling out, you may get confused. But let me tell you that WordPress is the most preferable one among them. This blog will let you know how to start a WordPress website for beginners. Let’s get initiated.
What is WordPress?

You have chosen WordPress as your prime asset to build a website. Well, it's one of the most admired content management systems on the web. WordPress is also said to be the most powerful space to host and build niche websites easily. It is aligned with its robust template system, plugins, and themes to build almost every type of niche website. Building any sort of business, blog, portfolio, or e-commerce site is just a simple process to adapt to. And now let’s hear out some vital benefits and drawbacks of WordPress.
Benefits of WordPress
- Firstly, WordPress is a free and open-source website-building platform. It can be easily used, even by beginners, and thus builds a strong community on the web. Almost everything with WordPress is free, and the plans are at affordable prices.
- It is frequently updated and comes with the trendiest features and elements to cater to your respective website.
- Small and non-techy entrepreneurs can also join hands with WordPress to build their business empires on the web.
- It is easy to install and mostly comes with a single-click installation facility. Also, its configuration is super easy and holds a step-by-step guide to moving further.
- Themes and plugins are limitless in number, covering all sorts of niche websites.
- Its interface is fully optimized, counting SEO factors including speed and performance.
- Also, the WordPress interface is fully customizable, so users can control their websites on their own.
- The Bootstrap Framework is the base element that provides mobile-responsive and cross-browser-compatible interfaces.
- Apart from all these, its customer support is top-level, prioritizing customers' queries on top grounds.
Drawbacks of WordPress
- There is a drawback that may not affect your mind now. This means that in the future, the site will receive an enormous amount of traffic. Eventually, the site will be unable to run smoothly while receiving millions of visitors.
- Another drawback is that it works like an important note that you should not rely on free plugins and themes every time.
How to Start a WordPress Website?
1. Choose the right WordPress platform (WordPress.com or WordPress.org)
For so many, it may look like they are not going through this stage. But let me tell you that you need to have a perfect selection. It's the cost of your business or blog on the web. Firstly, you need to know about what WordPress.org and WordPress.com are.
WordPress.org offers a fully customizable web design interface that is also free to use. But you need to buy WordPress software, hosting, domains, themes, and plugins. This platform is for those who wish to have full control and customization of their site. With WordPress.org, the user gets complete control and needs to edit the codes and pay for the security of your site. Overall, WordPress.org is good and free to use, but you need hands-on experience in web design and code.

While WordPress.com is a preferable choice as it comes with an all-in-one solution to web design, All the hard work is just gone when you have WordPress.com for web design. You never need to pay for the software, the hosting, or the domain. Simply pay for the right WordPress plan, and there you go. Even there is a free and paid version with WordPress.com. Where you can choose your preferred one and get everything done along with security. But the only thing is that you cannot walk with the free version of life. There is a limited quantity of themes, plugins, and features in the free version. You need to pay for further customization.
So, let me make it clear to you that going with WordPress.com is preferred by most beginners and novices. This only feature has made WordPress the most popular one among beginners. They find WordPress the best platform to have startup plans and existing businesses too. Because it does not require any codes to build your dream business online. So, let’s get initiated with the actual part, with the primary step of purchasing the WordPress plan with the “.com” version.
Choose the Right WordPress Plan (WordPress.com).
So, you are now ready to take the first step with our guide on how to start a WordPress website. Firstly, you need the right WordPress plan. On the WordPress official website, you will find various plans depending on the type of website you are going to build. Respectively, you will find plans such as personal, business, e-commerce, and premium plans. Or you can simply start with the free plan if you are a startup or new to introducing your niche on the web.
The plans vary according to the monthly charges, customization, and the type of marketing tools you need. So, you must get the right WordPress.com plan that goes according to your future assumptions about your niche.
2. Setup Domain and Hosting Provider
When you have the right WordPress.com plan, let’s move forward to owning the right domain for your site. A domain is the addressing element for any website on the web. This is the address at which users mainly find your niche on the web. This is the unique address, mostly ending with ".com," ".co,” and ".in."
This again implies on how to pick a domain name for your niche website. The right domain selection helps elevate your site’s appearance in many ways. So, you must know the right facts about choosing the right domain. Make sure your domain is short and precise, and that it is easy to pronounce and understand. It should represent your brand name, so ensure your domain has your brand name. Make sure your domain name is easy to remember, as people forget what they visited. As said, it should resemble your brand or company name so that it makes it easier for search engines to find. So, these are the top considerations you must look at while getting the right domain for your site.
Now comes the question of getting the right domain from which platform. There are so many domain registrars rolling over the web. You will find GoDaddy, NameCheap, DreamHost, and more. Apart from this, let me know that there are certified hosting services that come along with free domain names too. So, there is no need to find the domain registrar when you are going with a certified hosting service.
Learn more about website hosting from our previous blog web hosting tips, it gives a detailed guidance for web hosting.
Hosting Service
Talking about the hosting service, it works like the house of your website. That means all the necessary files and data are stored with the hosting service. It is the ultimate space, providing a separate server on which the website runs smoothly on the web. Getting the right hosting service is also important, as it greatly impacts the speed and performance of your site. It even impacts the security and reliability of your site. The right hosting service results in great speed and reliability when it has the latest PHP version and HTTPS support.
And again, there may be so many hosting services on the web, but you need to choose the best. Among the well-certified and qualified services, choosing one is crucial. There are many paid as well as free web hosting providers as well. But one certified and most preferred way to get all your considerations in budget. That is the Bluehost hosting service, giving all the perfect rounds of facts needed for a speedy and reliable website. So, without much discussion, let’s move further to get Bluehost as your website’s hosting provider.
Setup Hosting Service
- To set up your website with Bluehost, visit the official site and tap the Get Started button.
- From there, it will take you to the Bluehost pricing plans page, where you will find four plans listed with their respective benefits. The plans are basic, Choice Plus, online store, and pro.
- Note that all plans include a one-year domain name facility along with automatic WordPress installation.
- Among all four plans, let me suggest that if you are a startup or new to WordPress, going with the basic plan is recommended.
- It is affordable with 1 website, 10 GB of SSD storage, and chat support.
- Once you have made the decision, tap the Select button under the plan you have selected.
- The next page will guide you in choosing the domain for your website. You can search for the domain by simply adding your company name to the search box. This will list out various domains for you, and you simply need to select one of them and tap next.
- The next page is the page where you need to add personal information and billing details for your purchase.
- Simply complete the payment section, and it's done.
3. Install WordPress

Now is the time when you need to install WordPress right after getting the hosting service. You need to reach the Bluehost cPanel, and among so many tabs, find the “Install WordPress” tab and tap it. On the next page, there is an Install button in green that you need to tap to move ahead. The next page will ask if you want “www” in front of your domain name. By default, it will suggest keeping it, and you can simply tap the Check Domain button in green.
The next page will let you tick the necessary elements under the license agreement. Under this, you can check the username, password, email ID, and more. And lastly, check the “I Agree” terms and conditions and tap the “Install Now” button. A small window will appear, letting you know that WordPress is being installed. Once it's done, a message will appear, “WordPress installation is done,” with another tab, “View Credentials." Simply tap it to view the login credentials for WordPress. And now, finally, you can log in to your blank WordPress by using the given login details.
You are now on your newly designed website, with a WordPress menu on the left side and many options to explore. You have your blank website ready with no content. So, let’s bring out some content and theme assets to make it look lively.
4. Choose a WordPress theme
Since you are just a beginner, your next step in how to start a WordPress website is to choose a theme. You have a blank website ready to fill with creative content, that goes straight to getting the perfect WordPress theme for it.
WordPress itself holds a complete and endless range of qualified themes for almost any niche you have. Themes are WordPress design elements bundled with templates, features, and styles.
WordPress themes are so many that most of the time users get confused about which one to choose. Also, there are so many platforms selling out their qualified themes.
Out of them, let me introduce you to the most certified WordPress theme platform, i.e., VW Themes. Their themes are well-qualified in functionality, appearance, and custom designs. After all, the theme determines the overall design and functionality of your site. So, here are some of the top-designed themes you must consider while selecting the right theme for your site.
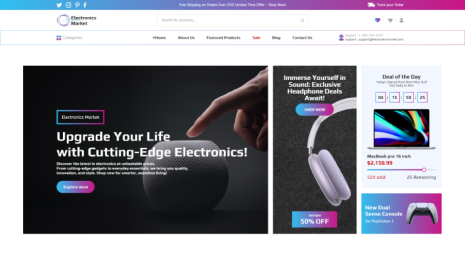
a) E-commerce landing page theme

The E-commerce Landing Page theme is a flexible solution to having an online e-commerce website. If you are a startup in e-commerce or an existing vendor, then this theme can give height to your business. It comes with the latest theme design and custom features to add. The theme has a professional structure built upon Bootstrap, resulting in fully responsive websites. It has a Woocommerce plugin, custom features, product galleries, and more to add.
b) Home Renovation WordPress Theme

There’s another theme under the top considerations: giving a stylish presence to home renovators. This premium home renovation theme works like magic for your business to shine on the web. Its design and interface are flexible and can be customized easily without any codes. It runs on the latest WordPress versions and has trendy features for your site. Plus, there are pre-made portfolios, galleries, and plugins to increase the overall functionality. You can start your online home renovation business without much effort using this theme.
c) Clothing Store WordPress Theme

The premium Clothing Store theme is the most-featured asset if you are into the apparel business. This is the theme that can give your clothing business a good boost in no time. Its flexible and clean design is what makes it look perfectly perfect for your online clothing store. Woocommerce makes it more attractive by providing the perfect online business website. There are more functional plugins to raise your site’s overall functionality.
d) Influencer Agency WordPress Theme

The premium influencer agency theme is built to influence youth, and agencies are hiring influencers. This can be your dream theme if you are an influencer, blogger, content creator, or hold an influencer firm. The theme has a modern and aesthetic design with smooth customization features. It has the Bootstrap Framework, giving it a fully responsive design. There are various custom styling features and templates for influencers to go through. Social media icons, plugins, and more features make it a worthy choice to have. This is your right spot to know about how to start a WordPress website.
Install WordPress Theme

So, these were the four just-launched themes to help you find the right theme. You can choose from these or simply visit the Best WordPress Themes page of VW Themes.
- Once you have selected the right theme for your WordPress website, it's time to get a quick installation for it.
- To install the WordPress theme, simply visit the theme page and scroll a little. You will see the “Buy Now” button, so tap it.
- Right after this, you will reach the checkout page, where you will need to fill out the billing details to complete the purchase.
- Once done, you will receive the zip file downloaded to your device.
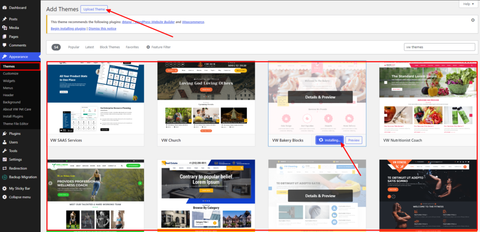
- Now reach your WordPress website’s dashboard and tap the Appearance tab. Under various options, tap the Themes option.
- On the next page, tap the Add New button to add a new theme.
- The next page will give you the option to upload the zip file of your chosen theme. Simply tap the Upload Now button and select the zip file for the theme. Once it is uploaded, tap the Install Now button.
- Once installed, you will reach the next page with the Activate button, and finally, the theme is yours.
- Immediately after this, the theme homepage will be opened for you to explore. You can visit its free demo content, install the necessary plugins attached to it, and customize it.
5. Add content to your website
WordPress mainly runs on the two primary content types, which are posts and pages. Posts are the blogging elements that are displayed in reverse chronological order on the website. Whereas, the pages are the static entities on your site, having elements that last forever on your site. Pages are mostly your website’s About Us, Privacy Policy, and more. Apart from these, WordPress has menus, widgets, comments, and media as its other content types.
- So, to add posts to your site, you will need to reach the WordPress dashboard area and tap the Post section under it.
- After this, press the "Add New" tab at the top bar.
- This will take you to a blank window where you can add content to your post using the drag-and-drop facility.
- There is a sidebar panel on the left; from there, you can simply double-tap or use the drag-and-drop facility to add any feature.
- The sidebar panel holds a set of blocks in the form of features to be added to your post. Blocks like galleries, images, videos, tables, audio, and more can be easily added.
- Once you are done adding content to the post, tap the publish button, and your post has been published.
Similarly, you can add pages by visiting the Pages section under the dashboard area. You can add various blog pages, product pages, and more by simply following the process.
6. Customizing the Website
Now comes the step in how to start a WordPress website where you can own the website by making certain changes of your choice. Let’s get it done.
- To customize your site, simply visit the Settings panel of the WordPress dashboard area.
- Under the General section, you can set the title and tagline of the site of your choice. Also, there are options like site address, email, time zone, and more to customize.
- Then, by visiting the Reading section under the Settings tab, you can customize the homepage settings, blog pages, and more.
- Also, you can add a navigation menu for easy navigation on the website. For this, simply visit the Appearance tab under the dashboard area and tap Menus.
- From there, you can create and save the menu, then visit the menu section and tap to add the newly created menu.
Not only this, you can customize the colour schemes, background styles, fonts, and more easily.
7. Install Plugins

Now is the time to extend the functionality of your site. This is only possible when you add plugins to your website. Plugins are tiny software elements that, when added to the website, raise the functionality. These can be added to any feature on your site, like adding a gallery, optimizing the speed, caching, and more. WordPress currently holds more than 55,000 active plugins in its plugin directory. The number is increasing day by day, only to boost the user experience.
The fact is that you cannot get every plugin on your site, as there are so many. So, we are here with some top advisory WordPress plugins that will help your site positively.
- The all-in-one SEO plugin is well-qualified in terms of boosting SEO ranks on your site.
- Then there is the Woocommerce plugin that can turn a normal website into an online store.
- WP Super Cache is a caching plugin that can boost the speed and performance of your site.
- Sucuri Security helps your site raise security measures, keeping your site away from malware and web threats.
- WP Forms is the contact form plugin that helps you insert contact forms on your site.
- Monster Insights is the plugin your site can easily connect with Google Analytics.
Steps to Install Plugins
- These are the vital plugins for a website to run smoothly.
- To install a plugin on your site, simply visit the WordPress dashboard and tap the Plugins section.
- The next page will display a list of already installed plugins. To add a new one, tap the Add New button.
- You will reach the plugins directory, where you can easily search for the plugins you need.
- Once searched, tap the Install button in front of the plugin.
- Once installed, tap the activate button to get it on your site.
8. Review your site and launch it
Now that we have reached the finish line of How to Start a WordPress Website, it needs a quick review. You have done everything that is needed for a website to run. Let’s just give it a quick try to see how it will look after launching. So, make sure that your homepage looks wow-worthy, as this will be the first page that users will visit. Everything must be in the right place, and the menus should work properly.
If you have inserted sliders, then make sure that they take you to the right destination on the site. Also, check whether the site easily loads on every screen size. Try to load your site on cross-browsers too. Check whether all the pages are loading fast and have the right content. You need to check that the plugins are running properly and not creating any mess while loading the site.
Finally, once you are done with all the reviewing, it's time to launch your site on the web and make it available for end users.
Conclusion
So, that was it about how to start a WordPress website. This was a detailed tutorial for those looking for an easy way to start their niche websites online. This blog can be your helping hand, as we have pinned every detail with ease so that even beginners can learn to create a website.
It all starts with the right guidance, and this blog is for you. Website creation can be fun when you are with WordPress, and that too without any codes required. Just follow the right steps, and you are ready with your niche website.
Whether you're a beginner or an experienced webmaster, investing in a quality WordPress bundle can save you time and effort in the long run, while ensuring your website stands out from the crowd.
From choosing the right WordPress platform, hosting, domain, themes, and plugins. Everything is mentioned with accurate details and the right steps to add them to your site. You simply need to go through the entire blog and start building your dream website.


